started
'08 MIDNIGHT SAPPHIRE BLUE Now Deceased
 |
 |
 |
 |
 |
 |
 |


Created on: 03/26/14 01:01 PM
Replies: 44
Rook
Joined: 03/28/09
Posts: 20592
cruderudy

Location: AMR
Joined: 08/15/12
Posts: 1963
Rook
Joined: 03/28/09
Posts: 20592
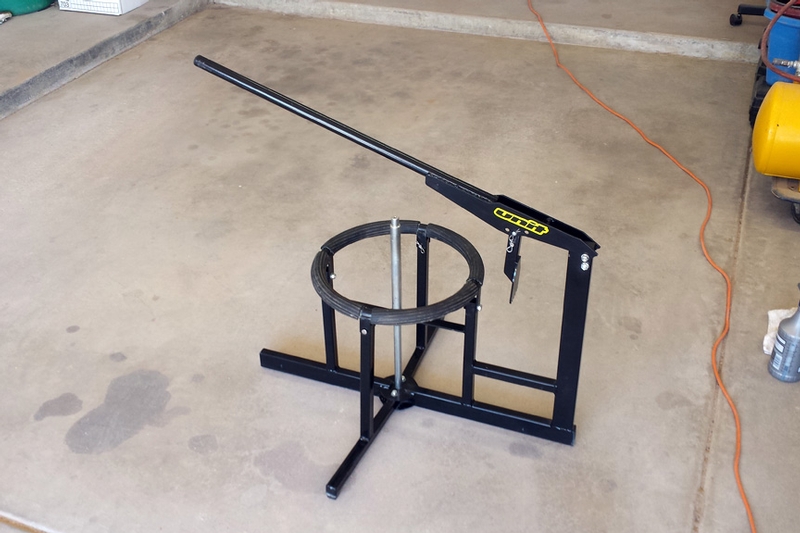
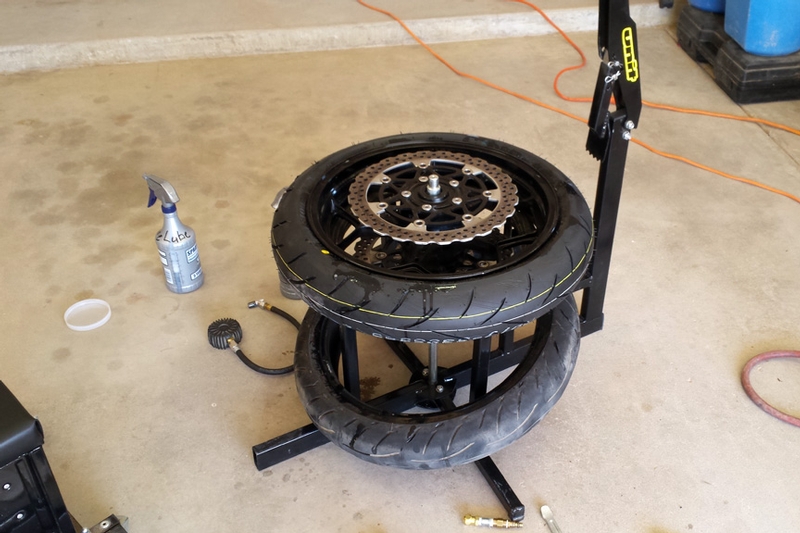
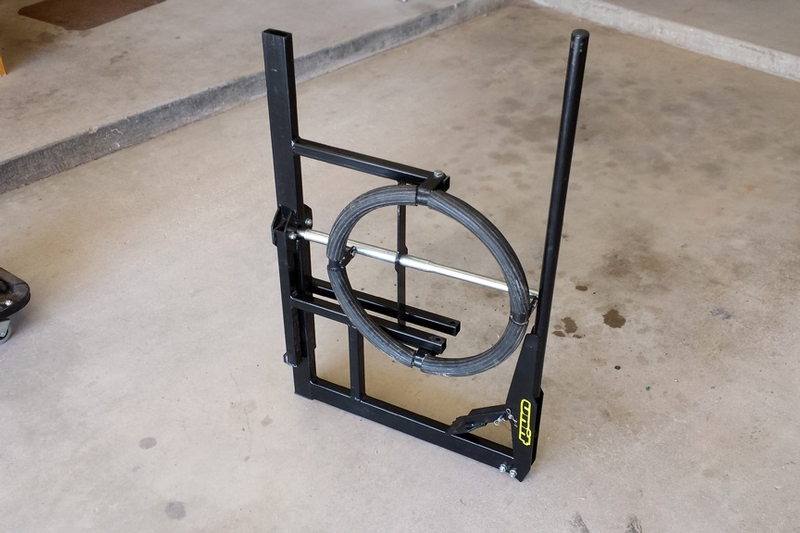
RE: Tire Removal and Mount
03/16/18 4:34 PM
That is coming next. It's here, I just need to update the pics.
I'd like to hear some input on strategies myself. All i know is o mount the dots on the tire at the heavy spot of the rim (usually near the air valve). i'm still usually perplexed by how much weight I need to add somewhere near the valve. Are the dots on the tires the light spot or the heavy spot? Are some tire manufacturers marking the heavy spot and others marking the light spot? I have to figure this out the next time I change tires.
piken

Location: Phoenix, AZ
Joined: 08/27/15
Posts: 665
RE: Tire Removal and Mount
03/16/18 5:39 PM
Rook,
Not sure if you tried but you might balance the rim without the tire first to find the
heavy spot and then match that to the tire dot.
I cut pieces of old rubber hose and glue to hoop as to not scratch my rims.
Instead of the motion pro rim protectors I cut out pieces of plastic from the sides of cat food containers, soap container, orange juice container, etc. for rim protectors. They are much thinner, protect great, free and easier to spoon the tire on since they are much thinner.
If you happen to scratch your rim, having some "Testers Enamel Paint Markers" on hand hides a scratch really good
and is durable.
If you're using a smaller compressor having having a 10 gallon portable tank inline to fill first
helps a lot for some extra air to seat the beads.
cruderudy
Location: AMR
Joined: 08/15/12
Posts: 1963
piken
Location: Phoenix, AZ
Joined: 08/27/15
Posts: 665
Rook
Joined: 03/28/09
Posts: 20592
RE: Tire Removal and Mount
03/16/18 7:51 PM
I cut pieces of old rubber hose and glue to hoop as to not scratch my rims.
Instead of the motion pro rim protectors I cut out pieces of plastic from the sides of cat food containers, soap container, orange juice container, etc. for rim protectors. They are much thinner, protect great, free and easier to spoon the tire on since they are much thinner.
If you happen to scratch your rim, having some "Testers Enamel Paint Markers" on hand hides a scratch really good and is durable.
I've always put dot to valve or heavy mark on rim. Or Barcode to valve since not everyone is
using dots anymore.
I also like to paint my wheel weights.
* Last updated by: Rook on 3/16/2018 @ 7:52 PM *
piken
Location: Phoenix, AZ
Joined: 08/27/15
Posts: 665
RE: Tire Removal and Mount
03/16/18 9:57 PM
Yea, milk carton plastic to thin. Pet food container, etc. Better. Lasts a dozen or so
tire changes.
I'm probably changing 6-8 sets of tires a year now, haven't timed it, but think can do
a tire in under 5 minutes.
I've changed the way I do things now, but here's a cheesy vid I made a while ago using low
budget tools, but shows anyone can do it.
https://youtu.be/1WWV5QRPY2w
Rook
Joined: 03/28/09
Posts: 20592
piken
Location: Phoenix, AZ
Joined: 08/27/15
Posts: 665
ExWifesChewToy

Location: Rochester,MN
Joined: 07/27/18
Posts: 117
RE: Tire Removal and Mount
09/27/18 10:20 AM
I love Rooks tutorials......but the best way to remove and install a tire on is with Harbor Freight Extra wide and long tip ties. about 8 for 3 bucks! You will need to take a small screw drive and release the tab to re-use your zip ties so when you put them on leave the buckle accessible to make it easier.
If you can put a tire on faster than 10-20 seconds....well not including the couple of minutes it takes to zip the tire in 6 spots that is, then post it cause I have never seen a way to remove and install a tire easier with the least amount of damage to a rim. Should be zero damage if done right. You will need a way to break the bead....Hub uses a vice....I will break down and buy a Northern Tool tire changer for 99 bucks....20 less if you get a 20% off coupon from ebay.
Here is the link I used. It took 7 seconds to do the rear tire and about 20 seconds to do the front.
removal vid
https://www.youtube.com/watch?v=U9MpgD-xIjg
install vid
https://www.youtube.com/watch?v=4-PD48uGl4o&t=8s
Chewy
cruderudy
Location: AMR
Joined: 08/15/12
Posts: 1963
piken
Location: Phoenix, AZ
Joined: 08/27/15
Posts: 665
ExWifesChewToy
Location: Rochester,MN
Joined: 07/27/18
Posts: 117
RE: Tire Removal and Mount
09/28/18 10:15 AM
This is the easiest and one of the cheapest ways to break bead, remove, install and balance tires. Note all videos used MC tires.
two large c-clamps. Watch the vid.
https://www.youtube.com/watch?v=v8CcVgATEno&t=53s
removing tire
https://www.youtube.com/watch?v=U9MpgD-xIjg&t=476s
installing tire
https://www.youtube.com/watch?v=U9MpgD-xIjg&t=491s
why stop there.....balancing
https://www.youtube.com/watch?v=DTjnA1-LAcI&t=175s
cheaper ghetto balancing
https://www.youtube.com/watch?v=5fim0mFH3Q0&t=128s
Rim was never touched with metal so your rims won't be scratched.
Chewy
* Last updated by: ExWifesChewToy on 9/28/2018 @ 10:25 AM *
Hub

Joined: 02/05/09
Posts: 13719
RE: Tire Removal and Mount
09/28/18 10:45 PM
Assist:
https://www.youtube.com/watch?v=v8CcVgATEno&t=53s
removing tire
https://www.youtube.com/watch?v=U9MpgD-xIjg&t=476s
installing tire
https://www.youtube.com/watch?v=U9MpgD-xIjg&t=491s
why stop there.....balancing
https://www.youtube.com/watch?v=DTjnA1-LAcI&t=175s
cheaper ghetto balancing
https://www.youtube.com/watch?v=5fim0mFH3Q0&t=128s
Rook
Joined: 03/28/09
Posts: 20592
RE: Tire Removal and Mount
09/29/18 9:07 AM

Piken can lever those tires on and off like butter but I'm sure that took lots of practice. Take it from a tire changing newb, if you have good rims, just take the rotors off and bring the wheels to a tire shop. I will try a Cycle Hill tire changer next but no experience with tire irons means you will at least nick the wheels up a little.
piken
Location: Phoenix, AZ
Joined: 08/27/15
Posts: 665
Hub
Joined: 02/05/09
Posts: 13719
ExWifesChewToy
Location: Rochester,MN
Joined: 07/27/18
Posts: 117
RE: Tire Removal and Mount
09/30/18 4:13 PM
see if it is that simple to on/off a tire.
Thanks and in all fairness I have not removed a tire but the guy in the video was doing a tire off a ZX6r so it is pretty darn close to ours.
Putting them on was so easy I only just barely leaned the the rear one and just started to rotate the tire a bit and it popped right on.....all of it. Meaning both edges land in the middle = no tire iron.
coming off can require one tire iron to get the edge over the lip and then you take your knee and push it all off. done. but again I have only seen it on the video. I had tires 12 years old and hard as stone to get off so I cut the tire back with a sawzall and exposed the beads....then took my harbor freight bolt cutters and went to town on the two cables.....sounds easy.....wasn't. Took about 10 minutes per cable. Wouldn't recommend it or do it again.
Now the c-clamp is cheap as hell. takes up no space. Won't have your wire roll her damn eyes at another purchse. and can be done in less than 10 minutes per tire. again per the video. no experience but I will video the entire process before spring.....I hope to beat Hub to it to get at them bragging rights.....just kidding. I actually owe him a lot of money saved this year. Talked me out of a lot of stupid shit and has dropped everything to help me when I had questions. Very cool dude.
Chewy
Hub
Joined: 02/05/09
Posts: 13719
RE: Tire Removal and Mount
10/08/18 8:56 PM
Talk about monetizing, I can't get even 2 minutes of look time. So I said fuck it. No vids, no photos. I just plowed thru the cleaning and mounting process. Takes more time to wipe the grease off the rim, swing, other areas, so here is how it went down.
1. Took a C-clamp, compressed the tire, laced a zip thru the gap. Slid the first zip away from the clamp and collapsed the tire. Zipped the remaining 3 zips and now I don't know if I should have used 5 instead, but it was not easy so I spooned the old rear off. Zipped the new rear tire and it popped on.
2. Kept the front tire in the vice, laced the zips thru the gap, ran 4 and spread them to a cross pattern. Popped right off. Took 5 zips and staggered them. Lubed all tires [on and off] with soapy water. New front popped right on.
3. Maybe if I staggered 5 zips on the old rear, maybe a second shot at it or a second hand would have done the trick. Either way, zips are the new mount/dismount moves.

Thanks, Chewy
New Post
Please login to post a response.