Move Close
Welcome to zx14ninjaform.com!

You are not logged in.
New Topic Reply
Next Page

Page: 1 2 3

Previous Page

Thread: Rear fender removal and DIY fender eliminator

Created on: 12/26/09 09:59 PM

Replies: 67

Rook


Rook's Gravatar

Joined: 03/28/09

Posts: 20579

Rear fender removal and DIY fender eliminator
12/26/09 9:59 PM

Gen1 (also works for Gen2) DIY Fender Eliminator

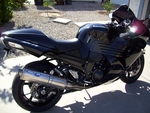
I always thought the rear fender looked pretty good on the 14. Not as good as no fender but compared to other bikes, the 14’s isn’t too bad. Still, it looks better without. You’ll be surprised at how much it weighs. Might as well get rid of it. There are a few fender eliminator license tag brackets out there, but if you want to save a few bucks, I have included a couple ideas for DIY brackets at the end of this How-To.

Do First:
Remove seat

Remove Toolbox

Remove Tail Light

A number of people have commented that it is unnecessary to remove the tail light and tail fairings. See comments after the tutorial, p 2.

Rear Fender Removal

You will need:

4mm hex tool
ratchet
5mm allen hex socket
3” extension
10mm open end wrench
needle nose pliers

1. Pull the relay box out of the rubber retainer.
[URL=http://s461.photobucket.com/user/Rookzx/media/2008%20ZX-14/ELECTRICAL%20SYSTEM-/RELAYS/Relay%20Box/removal-relay%20box/RearfenderremovalandDIYeliminato-4.jpg.html]

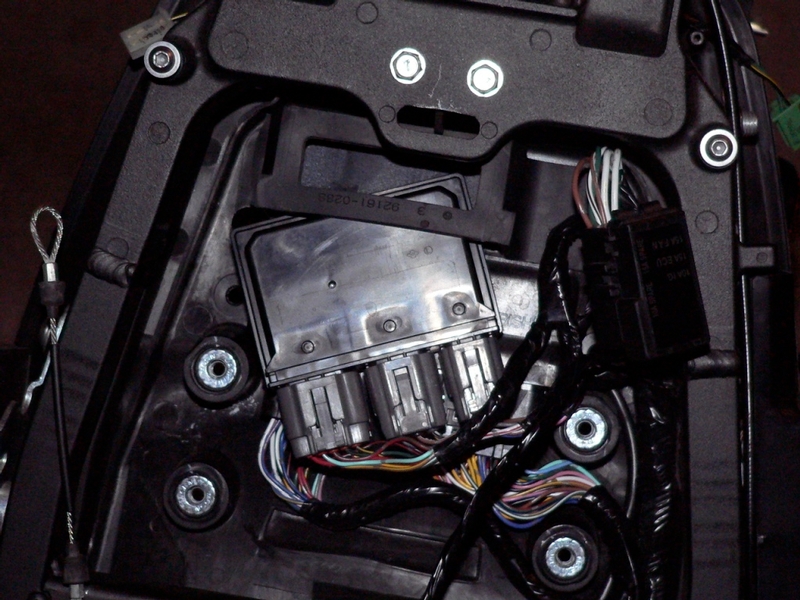
Pull the ECU out of the rubber retainer.

Locate the tag light lead and exit hole in the mudflap.

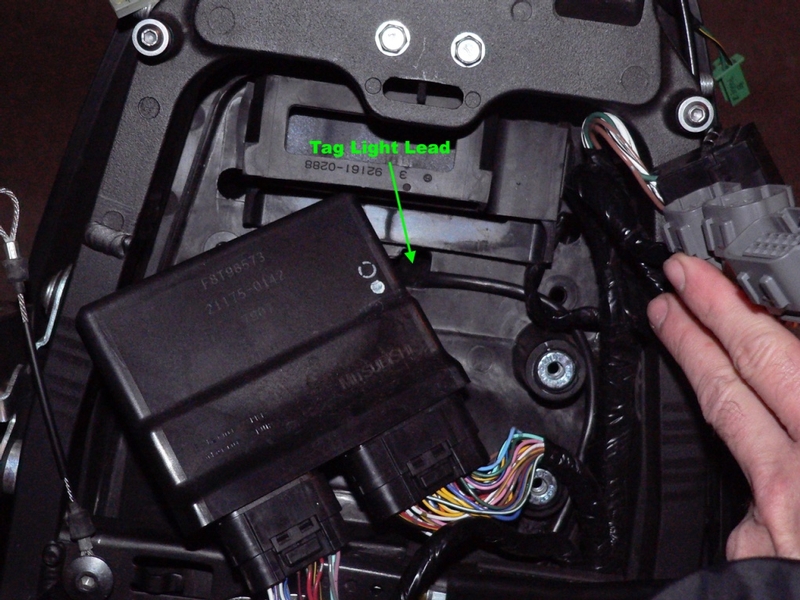
2. Locate the tag light lead connector.

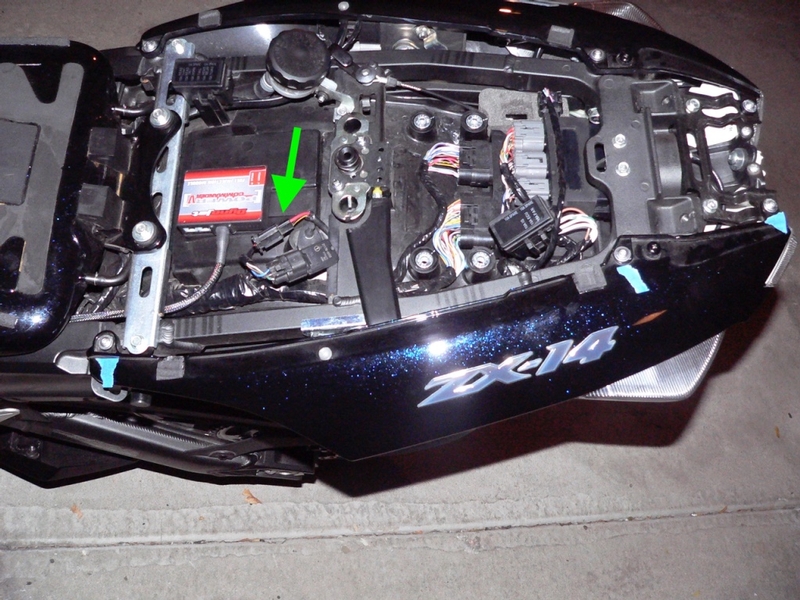
Disconnect the tag light lead.

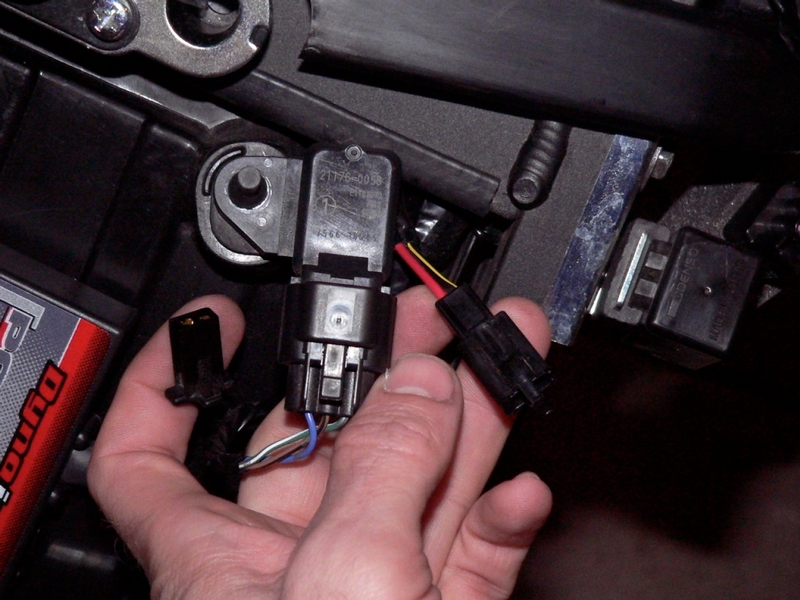
My thumb points to the tag light wire connector and the power source half of the connector rests on my pointer finger.

If you ever plan to use the connector remaining on the bike as a power source for aftermarket electronics (see LED Tag Light and Autotune Install), mark the female contacts NEGATIVE and POSITIVE.

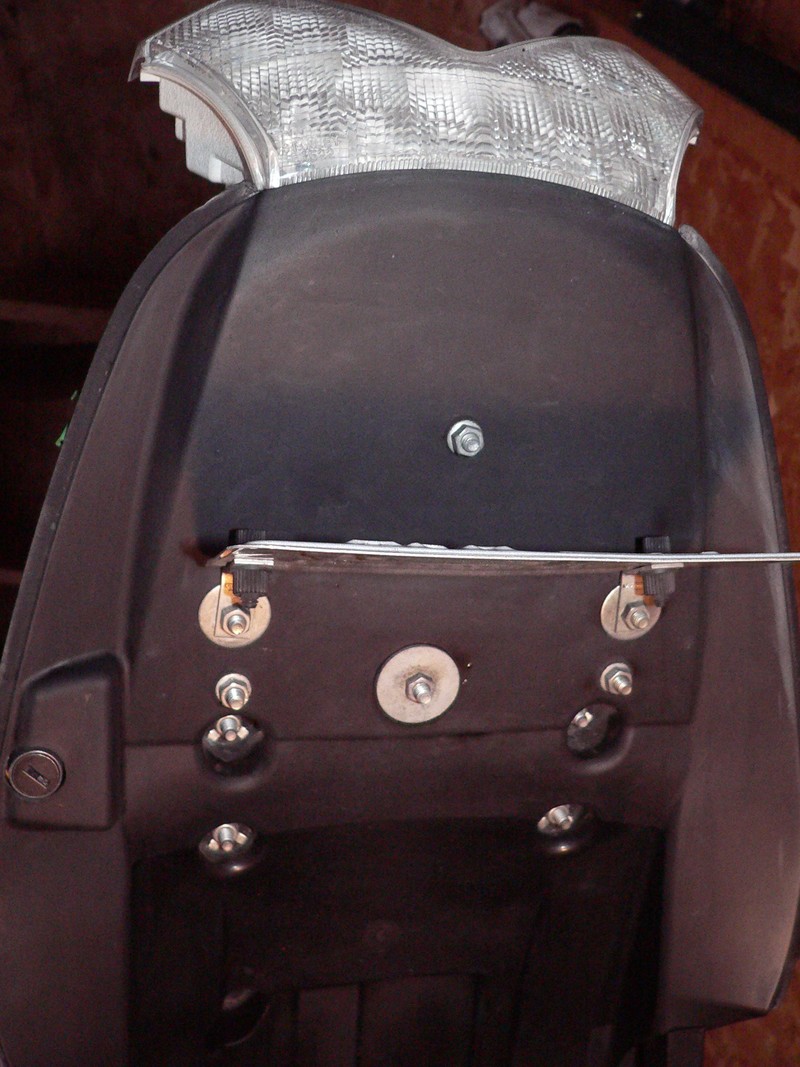
3. Use a 5 mm allen socket and 3” extension to remove the two front bolts and washers from the studs in the fender.?


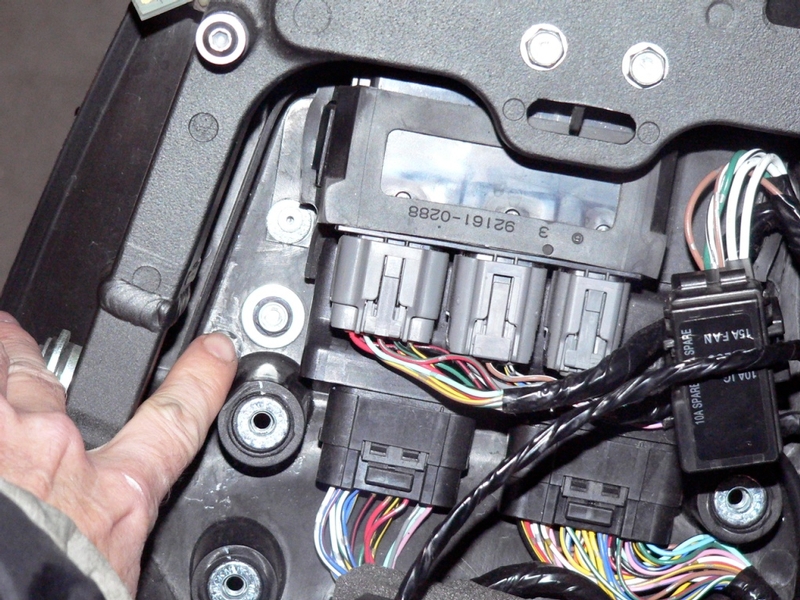
4. Using a 10 mm open end wrench, hold nut on rear fender bolt.

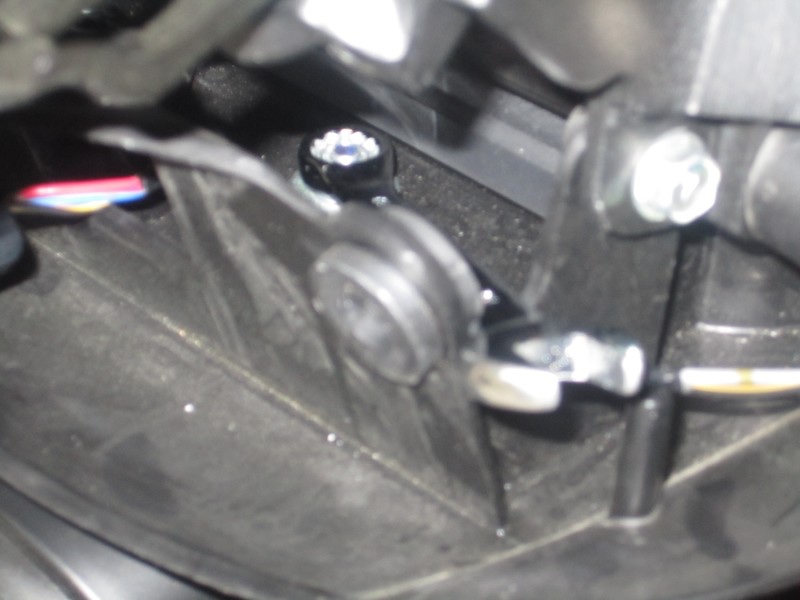
Place the wrench through the hole that the tail light wire passes through where it connects to the tail light.

Remove the bolt and washer from below the fender using a 10 mm socket.

Retrieve the washer and nut from the top using a needle nose pliers.

5. Slide the tag light lead under the cross member on the tail frame and guide wire through the exit hole in the mudflap as you remove the rear fender.


Installation
6. Installation is the reverse procedures of steps 1 through 6.


DIY Cheapy Fender Eliminator
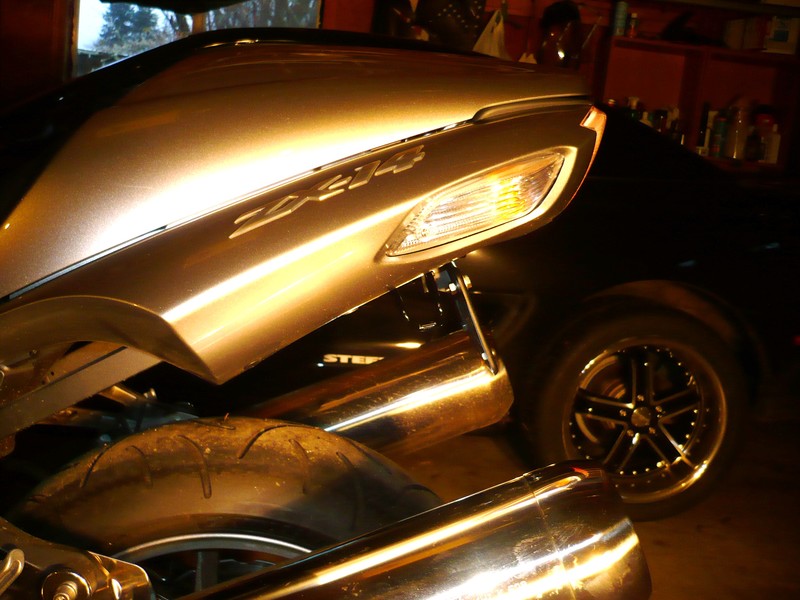
This is a quick and easy way to attach you license plate after fender removal. The existing holes line up perfectly with license plates. You could use either of the holes shown in the first pic below. I chose the larger holes because they are farther back and this looks better IMO.

You will need:
A vice and vicegrips or just 2 pair of vise-grips will work fine
10mm box wrench
10 mm socket with 4” extension
blue Locktite
2 one inch steel L brackets
2 M6 x 16mm hex cap screws
2 M6 hex nuts
2 six mm flat washers
4 three sixteenths by one inch fender washers
OEM license plate screws and nuts

The brackets are bent open using a vise and vise grips to create an appealing angle for the license plate.

The cap screw is placed through a 1” fender washer. The screw and washer are placed inside the seat compartment so that the threads drop through the hole shown below. Use some blue Locktite on the threads. A 6mm flat washer is placed over the threads. This will help keep the screw centered in the hole. A second 1” fender washer is placed on the outside of the mud flap and an L bracket is placed on next. Finally, all pieces are fastened with a 10mm hex nut. The L brackets can be bent a small amount for a perfect angle after the plate is attached using the OEM plastic license plate screws and nuts.


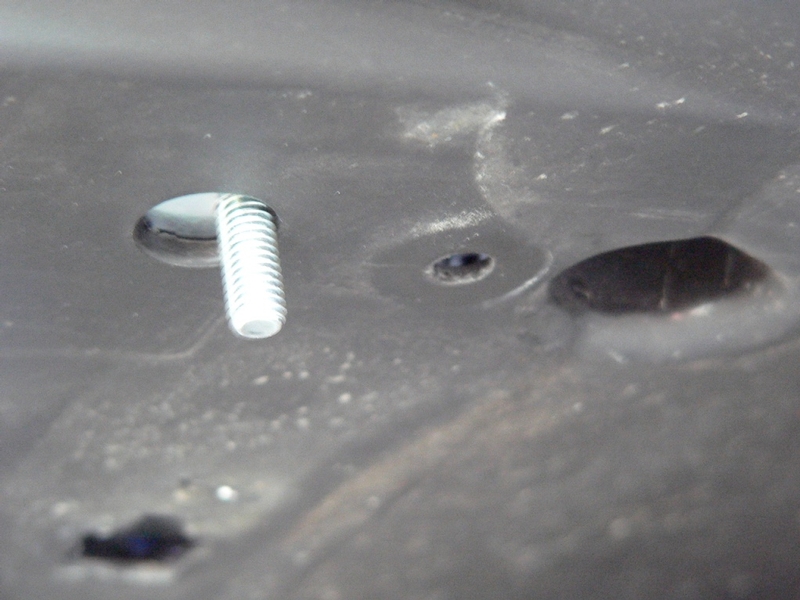
This is the order that the pieces are assembled. The small washer fits inside of the hole in the mud flap to keep the screw centered.

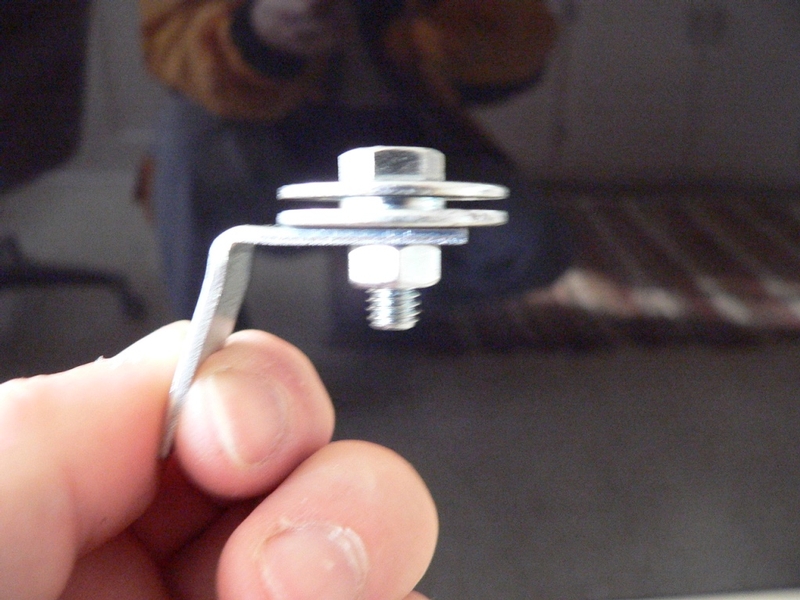
Not too shabby for 3- 4$$, huh?
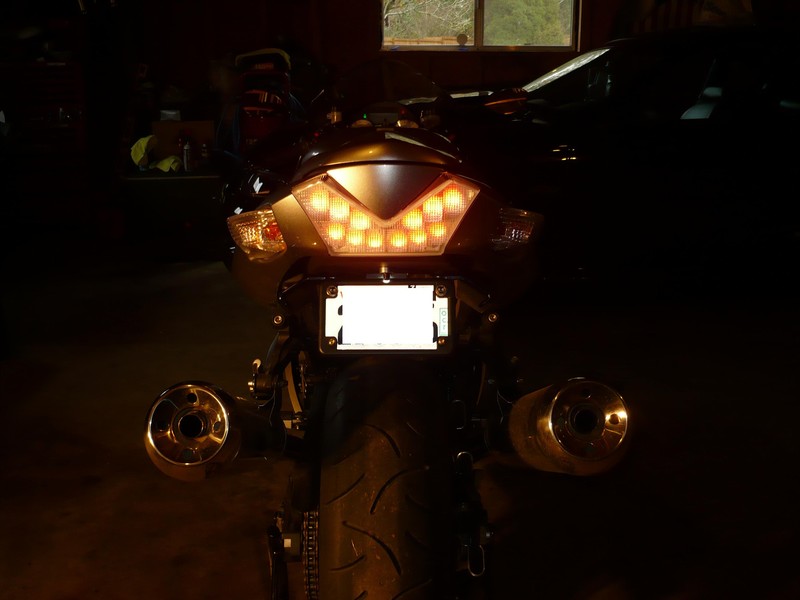
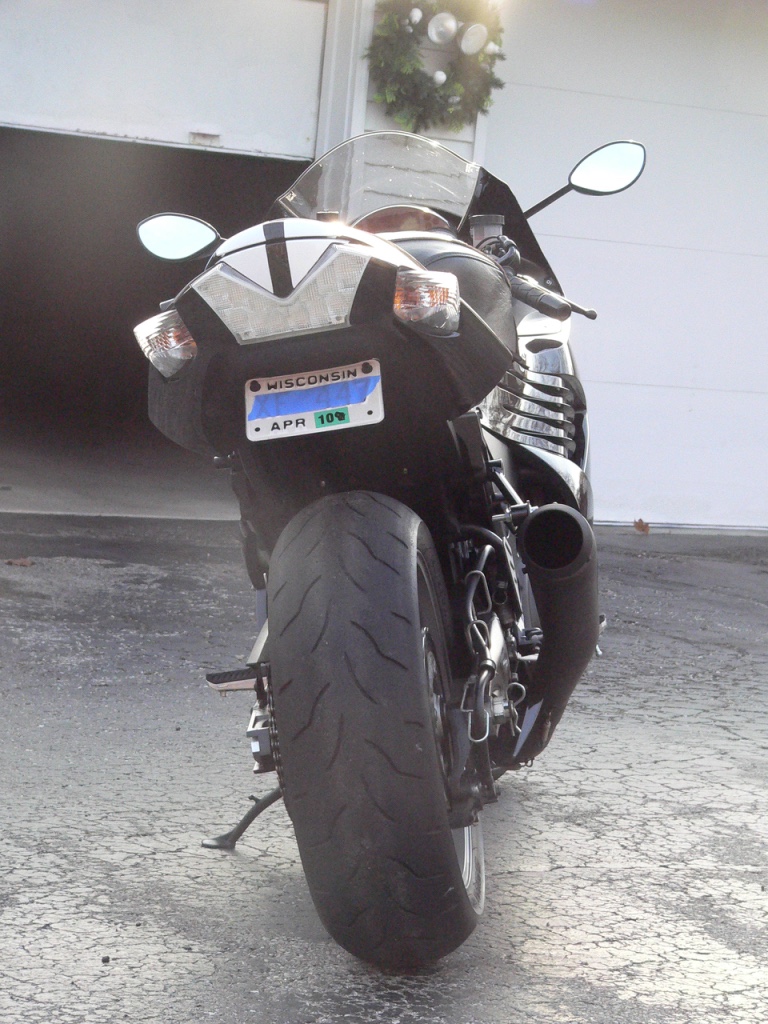
Before

After


You can keep going on this little job. I plugged the screw holes under the tail by using some small nuts and bolts and neoprene lined washers. The large washers are called fender washers. I was able to find a rubber washer that matched them perfectly and I placed that between the fender washer and the bottom surface of the tail. The screw that is farthest to the back seems to be perfectly positioned for illumination of the plate (see LED Tag Light).

Weights
The entire rear fender assembly with all equipment weighs 1 pound 13.7 oz.


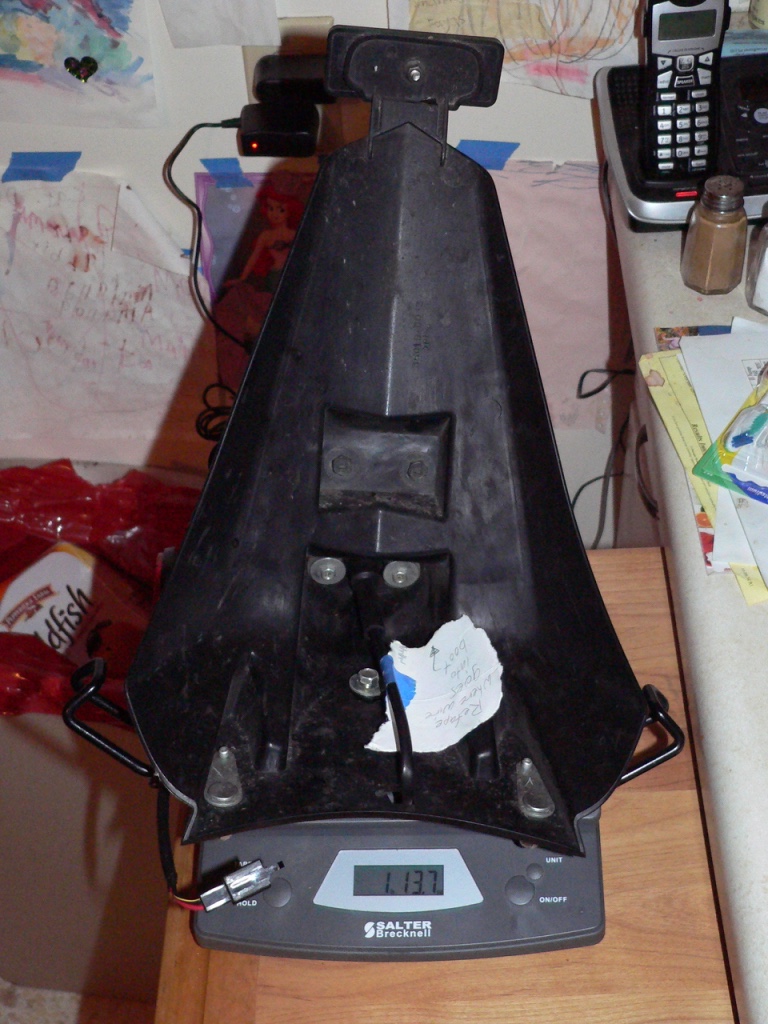
* Last updated by: Rook on 11/10/2017 @ 9:42 PM *


'08 MIDNIGHT SAPPHIRE BLUE Now Deceased

Link | Top | Bottom

AZ14


Location: NW Phx, Arizona

Joined: 02/23/09

Posts: 54

RE: Rear fender removal and DIY fender eliminator
12/27/09 8:03 PM

Rook,
I did the same mod to my bike. The one exception is that I used a solid piece of aluminum for my license plate bracket. Also, I cut the wire and connector to the license plate light from the old fender. I bought a set of LED license plate bolts from Checker Auto Parts (Thats what they are called here in Arizona). They were about $6.00. I installed the 10 mm LED license plate bolt in that single centered hole above the license plate. Soldered the connector to the lead, and plugged it in. Clean and legal.

Link | Top | Bottom

Rook


Rook's Gravatar

Joined: 03/28/09

Posts: 20579

RE: Rear fender removal and DIY fender eliminator
12/28/09 9:11 AM

Thanks, AZ! I was wondering how i was going to get my hands on a set of those awesome tag LEDs. The only place I have ever seen them is included as an option on the Hot Bodies fender eliminator and then you have to pay $60 to get the whole kit. We have Checker here. I'm down there to get me some LED's. I'll hook a wire back under there to the connector under the seat so I don't need to cut the OEM wire.

Here's my makeshift connectors. Wrap it up with electrical tape and it's done.

I plan to weld or screw some aluminum straps together for a tag bracket so the plate will be positioned back farther. there are plenty of holes under there. One strap right down the center would work but then the plate might wobble. I will probably go with a smaller strap on each side to stabilize the plate.


* Last updated by: Rook on 1/16/2011 @ 12:48 PM *


'08 MIDNIGHT SAPPHIRE BLUE Now Deceased

Link | Top | Bottom

scottjkyl


scottjkyl's Gravatar

Location: east jordan,mi

Joined: 06/26/09

Posts: 1851

RE: Rear fender removal and DIY fender eliminator
01/25/10 7:20 AM

Rook I dont understand why you tore apart the whole back end to do this job? all you really need to do is remove the tool box and move ecu outta the way. like the how to pics but imo you took it much further than you needed to for this mod lol i think you just like undressin the old girl lmao


08 zx14se Brocks CT Duals, Brocks street map, Driven 16/43 sprockets,EK ZZZ Chain,MRA Windscreen, Roaring Toyz Diamond Cut Grips Pingel Elec shifter, Hyper-Pro RSC Damper, BlackChrome Wheels, Sargent Seat,Factory Pro Velocity Stacks,PCIII USB,Bonneville Pro, TPX Radar/Laser Detector, TPX Laser Jammer, Goodridge Shadow series braided lines front and rear, Rifleman 1/5 turn throttle, Fusion LED Stage IV Kit, DDM HID's 10,000k

Link | Top | Bottom

scottjkyl


scottjkyl's Gravatar

Location: east jordan,mi

Joined: 06/26/09

Posts: 1851

RE: Rear fender removal and DIY fender eliminator
01/25/10 7:23 AM

btw rook love the looks of that cannon on the side of her...very sharp well have to get together and ride the up this summer


08 zx14se Brocks CT Duals, Brocks street map, Driven 16/43 sprockets,EK ZZZ Chain,MRA Windscreen, Roaring Toyz Diamond Cut Grips Pingel Elec shifter, Hyper-Pro RSC Damper, BlackChrome Wheels, Sargent Seat,Factory Pro Velocity Stacks,PCIII USB,Bonneville Pro, TPX Radar/Laser Detector, TPX Laser Jammer, Goodridge Shadow series braided lines front and rear, Rifleman 1/5 turn throttle, Fusion LED Stage IV Kit, DDM HID's 10,000k

Link | Top | Bottom

scottjkyl


scottjkyl's Gravatar

Location: east jordan,mi

Joined: 06/26/09

Posts: 1851

RE: Rear fender removal and DIY fender eliminator
01/25/10 7:30 AM

Rook do you have a how-to on undressing the front end ive got some fairing screens coming any help on getting the upper plastics off would be appreciated thanks

this is what im installing


* Last updated by: scottjkyl on 1/25/2010 @ 7:57 AM *


08 zx14se Brocks CT Duals, Brocks street map, Driven 16/43 sprockets,EK ZZZ Chain,MRA Windscreen, Roaring Toyz Diamond Cut Grips Pingel Elec shifter, Hyper-Pro RSC Damper, BlackChrome Wheels, Sargent Seat,Factory Pro Velocity Stacks,PCIII USB,Bonneville Pro, TPX Radar/Laser Detector, TPX Laser Jammer, Goodridge Shadow series braided lines front and rear, Rifleman 1/5 turn throttle, Fusion LED Stage IV Kit, DDM HID's 10,000k

Link | Top | Bottom

Rook


Rook's Gravatar

Joined: 03/28/09

Posts: 20579

RE: Rear fender removal and DIY fender eliminator
01/25/10 10:52 AM

Rook I dont understand why you tore apart the whole back end to do this job? all you really need to do is remove the tool box and move ecu outta the way. like the how to pics but imo you took it much further than you needed to for this mod lol i think you just like undressin the old girl lmao

Yeah, you're right.

The brake light and sides of the tail need to come out in order to get a wrench on the last nut that holds the fender to the underside. The front two bolts (under the ECU) that fasten the fender have threaded sleeves that remain stationary but the back one has a nut and washer instead. When I turned the bolt under the bike, the nut rotated so it was necessary to hold the nut with a wrench. It was also a lot easier to pick the nut and washer out of there after the bolt was removed. Maybe some people are lucky enough to have that nut stick while they turn the bolt and they don't mind leaving the nut and washer in there to bounce around until it falls out. I am a bit of a perfectionist, I guess.

Definitely let's ride this summer!

Rook do you have a how-to on undressing the front end ive got some fairing screens coming any help on getting the upper plastics off would be appreciated thanks

this is what im installing

I always liked those screens. I was thinking about installing some myself last year.

I have no pics of removing the side fairings but I think there is a fairing removal thread included with the "full System Exhaust install" How Too. The sides are not hard to remove. You may benefit from a second set of hands when disconnecting the turn signal wire. I can unclip that with one hand now but it may be a little tough the first time. The sides are harder to put back on. That peak that sticks forward on the top front is always hard to get positioned correctly because the whole side has to swing into place on the tab hooks and that peak has to fit into a small place. It will go in easier if you just remove the soft plastic plate that forms the floor of the nose section. Then it is usually hard to get the soft plastic plate back in corrcetly- lol. Take a good look with a flashlight at how that plate fits with the side fairing before and as you remove it. It can be confusing. I still usually have a little trouble getting it back in and it's been off about 8 times.

Fairing removal is here in the Brock PDF:

Looks like much better instructions than in the Kawi manuals but there are a few small issues that are not addressed Anyone will still run into a couple befuddlements the first couple times they defairing the bike. The tab hooks that the fairings swing into place on are one thing and the quick rivets are another. It's all easy once you do it a couple times. Just post some questions and it will get cleared up pretty quick.


* Last updated by: Rook on 1/25/2010 @ 11:11 AM *


'08 MIDNIGHT SAPPHIRE BLUE Now Deceased

Link | Top | Bottom

russty


Location: O'straya

Joined: 02/15/09

Posts: 230

RE: Rear fender removal and DIY fender eliminator
01/25/10 2:24 PM

Hey scottjkyl,

have you got a link for that grill?


08 sapphire

Link | Top | Bottom

scottjkyl


scottjkyl's Gravatar

Location: east jordan,mi

Joined: 06/26/09

Posts: 1851

RE: Rear fender removal and DIY fender eliminator
01/25/10 4:02 PM

here you go rusty they are on ebay have them in chrome and black they are the 69.99 ones with free shipping and they ship worldwide.

http://motors.shop.ebay.com/i.html?_nkw=zx14+screens&_sacat=10063&_trksid=p4506.m270.l1313&_dmpt=Motorcycles_Parts_Accessories&_odkw=&_osacat=10063#item20af1c18b5


* Last updated by: scottjkyl on 1/25/2010 @ 4:03 PM *


08 zx14se Brocks CT Duals, Brocks street map, Driven 16/43 sprockets,EK ZZZ Chain,MRA Windscreen, Roaring Toyz Diamond Cut Grips Pingel Elec shifter, Hyper-Pro RSC Damper, BlackChrome Wheels, Sargent Seat,Factory Pro Velocity Stacks,PCIII USB,Bonneville Pro, TPX Radar/Laser Detector, TPX Laser Jammer, Goodridge Shadow series braided lines front and rear, Rifleman 1/5 turn throttle, Fusion LED Stage IV Kit, DDM HID's 10,000k

Link | Top | Bottom

scottjkyl


scottjkyl's Gravatar

Location: east jordan,mi

Joined: 06/26/09

Posts: 1851

RE: Rear fender removal and DIY fender eliminator
01/25/10 4:02 PM

rook they got em for the busa too lol


08 zx14se Brocks CT Duals, Brocks street map, Driven 16/43 sprockets,EK ZZZ Chain,MRA Windscreen, Roaring Toyz Diamond Cut Grips Pingel Elec shifter, Hyper-Pro RSC Damper, BlackChrome Wheels, Sargent Seat,Factory Pro Velocity Stacks,PCIII USB,Bonneville Pro, TPX Radar/Laser Detector, TPX Laser Jammer, Goodridge Shadow series braided lines front and rear, Rifleman 1/5 turn throttle, Fusion LED Stage IV Kit, DDM HID's 10,000k

Link | Top | Bottom

Rook


Rook's Gravatar

Joined: 03/28/09

Posts: 20579

RE: Rear fender removal and DIY fender eliminator
01/25/10 5:04 PM

I've seen them. I'm still pretty strict about being able to reverse mods though and i see those are held by epoxy. I guess double sided tape would do the trick with a zip tie mount and safety wire. I don't know, it gets pretty hot in there for self adhesive stuff.


'08 MIDNIGHT SAPPHIRE BLUE Now Deceased

Link | Top | Bottom

scottjkyl


scottjkyl's Gravatar

Location: east jordan,mi

Joined: 06/26/09

Posts: 1851

RE: Rear fender removal and DIY fender eliminator
01/25/10 5:11 PM

yea rook i know someone that used the tape and im like you thats y im going to bring them in the house and use silicone chaulk that will hold just as good as epoxy and scrapes off easy enough if they need to come back out


08 zx14se Brocks CT Duals, Brocks street map, Driven 16/43 sprockets,EK ZZZ Chain,MRA Windscreen, Roaring Toyz Diamond Cut Grips Pingel Elec shifter, Hyper-Pro RSC Damper, BlackChrome Wheels, Sargent Seat,Factory Pro Velocity Stacks,PCIII USB,Bonneville Pro, TPX Radar/Laser Detector, TPX Laser Jammer, Goodridge Shadow series braided lines front and rear, Rifleman 1/5 turn throttle, Fusion LED Stage IV Kit, DDM HID's 10,000k

Link | Top | Bottom

Rook


Rook's Gravatar

Joined: 03/28/09

Posts: 20579

RE: Rear fender removal and DIY fender eliminator
01/25/10 9:11 PM

ah- nice idea.


'08 MIDNIGHT SAPPHIRE BLUE Now Deceased

Link | Top | Bottom

dogszzr


Joined: 07/22/09

Posts: 6

RE: Rear fender removal and DIY fender eliminator
02/07/10 8:03 AM

Very good post. Wish I saw this before I spent $20 on a plate plus I had to paint it.

Link | Top | Bottom

Rook


Rook's Gravatar

Joined: 03/28/09

Posts: 20579

RE: Rear fender removal and DIY fender eliminator
02/07/10 10:14 AM

I'm sure some people will want to change to a real fender eliminator at some point but the L brackets work fine if you're in a hurry and want to go cheap.


'08 MIDNIGHT SAPPHIRE BLUE Now Deceased

Link | Top | Bottom

nicol77


nicol77's Gravatar

Location: Galion, Ohio

Joined: 02/10/10

Posts: 18

RE: Rear fender removal and DIY fender eliminator
02/17/10 10:07 AM

thats awesome..too bad I just bought a Muzzy's


07' ZX14 (all stock right now)
02' ZX12

Link | Top | Bottom

Matsuke


Matsuke's Gravatar

Location: Netherlands

Joined: 08/26/09

Posts: 463

RE: Rear fender removal and DIY fender eliminator
04/09/10 2:38 AM

I'd like to do the same with my Rear fender - But i heard alot of stuff about the LED/Light thats shining upon the License plate. Over here we have to have that; Whats the best way to maintain that light for the Plate?

Rook, does yours still have the light?


Current:
ZZR1400 - 2006
ER-500 - 2003 (GF's)

Ex Girlfriends:
YZF600 - 2001
-------------------------
Drive safe, but not too safe.

Link | Top | Bottom

scottjkyl


scottjkyl's Gravatar

Location: east jordan,mi

Joined: 06/26/09

Posts: 1851

RE: Rear fender removal and DIY fender eliminator
04/09/10 5:30 AM

i bought a set of the bolt lights. They replace the license plate bolts and light the plate up nicely.


08 zx14se Brocks CT Duals, Brocks street map, Driven 16/43 sprockets,EK ZZZ Chain,MRA Windscreen, Roaring Toyz Diamond Cut Grips Pingel Elec shifter, Hyper-Pro RSC Damper, BlackChrome Wheels, Sargent Seat,Factory Pro Velocity Stacks,PCIII USB,Bonneville Pro, TPX Radar/Laser Detector, TPX Laser Jammer, Goodridge Shadow series braided lines front and rear, Rifleman 1/5 turn throttle, Fusion LED Stage IV Kit, DDM HID's 10,000k

Link | Top | Bottom

dogszzr


Joined: 07/22/09

Posts: 6

RE: Rear fender removal and DIY fender eliminator
04/09/10 2:50 PM

Yes Matsuke, just get some led bolt lights. Very simple and cost me $12 on ebay but here is a sample of what to look for http://www.thefind.com/cars/info-license-plate-bolt-lights

Link | Top | Bottom

darryle


darryle's Gravatar

Location: ontario

Joined: 02/15/09

Posts: 1185

RE: Rear fender removal and DIY fender eliminator
04/09/10 4:33 PM

Most car stereo places sell LED pretty cheap.I installed LEDS on my ZZR1200 for under 5 bucks,on the 14 I didn;t bother just use my tail light.I was hassseled once in the tri- state cant remember if it was N.C or GA .The cop let me go asI had an ONT. plate


2012 14R,full hindle Evolution ,vortex rear sets,BST's with ceramic bearings,HID's,hyper pro damper and custom map 205.3 hp/120.2 torque

Link | Top | Bottom

Rook


Rook's Gravatar

Joined: 03/28/09

Posts: 20579

RE: Rear fender removal and DIY fender eliminator
04/22/10 10:27 PM

If you position the DIY fender eliminator as I have done, there is a hole under the mud flap a couple inches in front of the plate. That would be the perfect location for a small LED to illuminate the LicPLate. I like the plate bolt LEDs too. Those will work no matter where the license plate ends up getting situated.

I have heard of people using a stick up Light like they have for putting in closets. I suppose that would be much too bright but you could always spraypaint part of it black to block some light, I guess.


'08 MIDNIGHT SAPPHIRE BLUE Now Deceased

Link | Top | Bottom

buck20


buck20's Gravatar

Location: Peoria, Arizona

Joined: 03/12/09

Posts: 325

RE: Rear fender removal and DIY fender eliminator
05/11/10 5:50 AM

Come on guys your working on your zx14 not the lawn mower! Oh wait I forgot in your part of the country the lawn mower is precious.


To much to list!

Link | Top | Bottom

Rook


Rook's Gravatar

Joined: 03/28/09

Posts: 20579

RE: Rear fender removal and DIY fender eliminator
05/25/10 8:27 AM

Hey , Man...don't be dissin' on my lawn mower!


'08 MIDNIGHT SAPPHIRE BLUE Now Deceased

Link | Top | Bottom

DogoZX


DogoZX's Gravatar

Location:

Location: Location!

Joined: 02/26/09

Posts: 2889

RE: Rear fender removal and DIY fender eliminator
11/19/10 12:16 PM

Did my own DIY mudflap removal yesterday. Cost $5, for the LED. Stoked 'cuz I was able to retain the tiedown hooks.


"Life should not be a journey to the grave with the intention of arriving safely in a pretty and well preserved body, but rather to skid in broadside in a cloud of smoke, thoroughly used up, totally worn out, and loudly proclaiming "Wow! What a Ride!” HST

Link | Top | Bottom

Grn14


Grn14's Gravatar

Location: Montana

Joined: 02/25/09

Posts: 15511

RE: Rear fender removal and DIY fender eliminator
11/19/10 1:17 PM

There ya go!Easy Peasy...I used the connie seat latch hooks for my license holder.Fit PERFECTO!!!!Who woulda thought?

Sweet Ride Dogo...Congrats Bro!!!!Really nice lookin.(don't wanna sound ignorant here Dogo...but your "last" 14 gave up the ghost,yes?)That was the one with the hole in er belly?


* Last updated by: blue07 on 11/19/2010 @ 1:20 PM *

Link | Top | Bottom


Welcome to zx14ninjaform.com!
 
New Topic Reply
Next Page

Page: 1 2 3

Previous Page

New Post

Please login to post a response.