Move Close
Welcome to zx14ninjaform.com!

You are not logged in.
New Topic Reply
Next Page

Page: 1 2

Previous Page

Thread: Rear and Front Brake pad Install

Created on: 08/10/11 12:00 AM

Replies: 28

Rook


Rook's Gravatar

Joined: 03/28/09

Posts: 20589

Rear and Front Brake pad Install
08/10/11 10:47 AM

Front and Rear Brake Pads Replacement

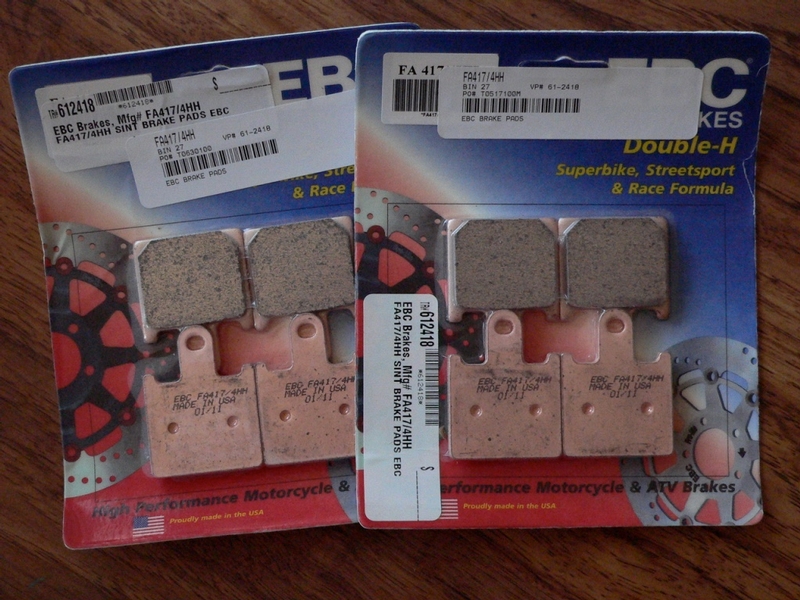
I use EBC Double H brake pads for front and rear.

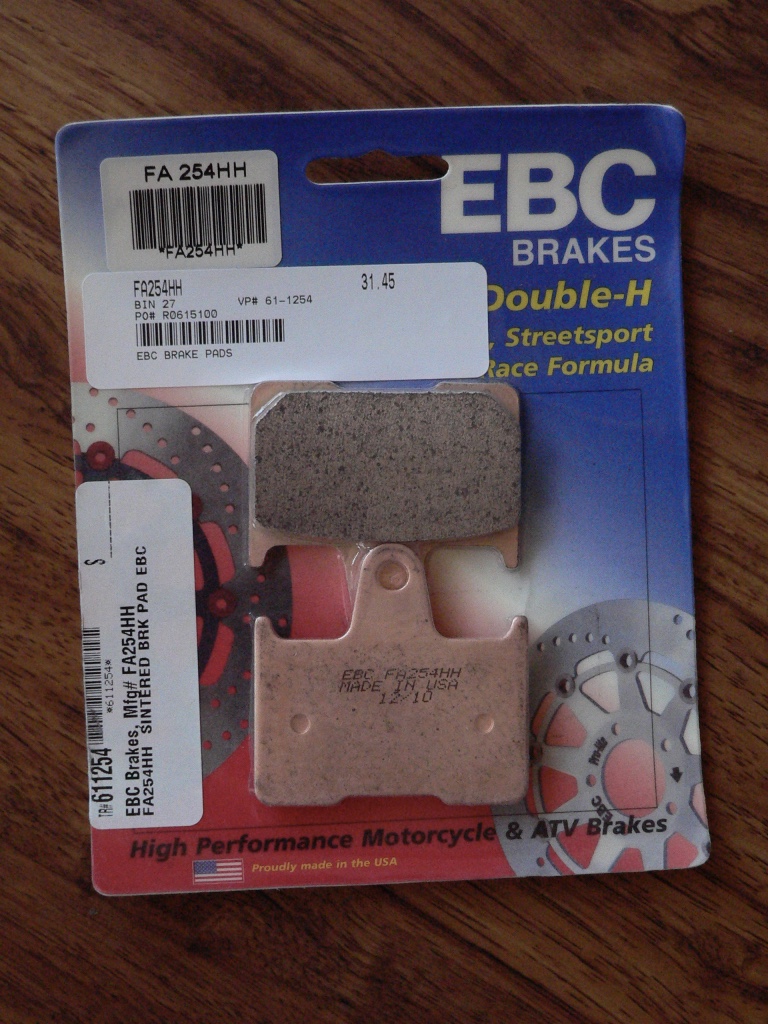
Based on the recommendations I received from ZX-14 owners EBC HH pads were the best performing aftermarket brake pad. The Organic EBCs were not considered to be a very good choice and the EBC pads made for track use were recommended by owners as being good for track use only. They are designed for hightemp and are not at their best on the street. OEM replacement pads were recommended about as often or mentioned as being equal to the EBC HH pads.

So far, my experience with the EBC HH pads has been good. They are perfectly silent where the OEM pads were squeaky at very low speed. The breaking performance and strength of the EBC HH is at least as good as the OEM pads. The most severe braking i have ever done was to lock the front at 70 mph with my 210 lbs on the bike. That was with OEM pads. I don't recall squeezing the lever extremely hard. I was able to modulate the lever to control the locking. I think any pads that work as well as the OEMs will be sufficient for just about any sport or street use, with the ZX-14.

Tools
5mm hex tool
6mm hex tool
wire
Scotch Bright pad
automotive soap
denture brush
brake parts cleaner
sheet of cardboard
new brake pads
torque wrench
Sharpie permanent marker
rag

Rear Brake Pads
Removal

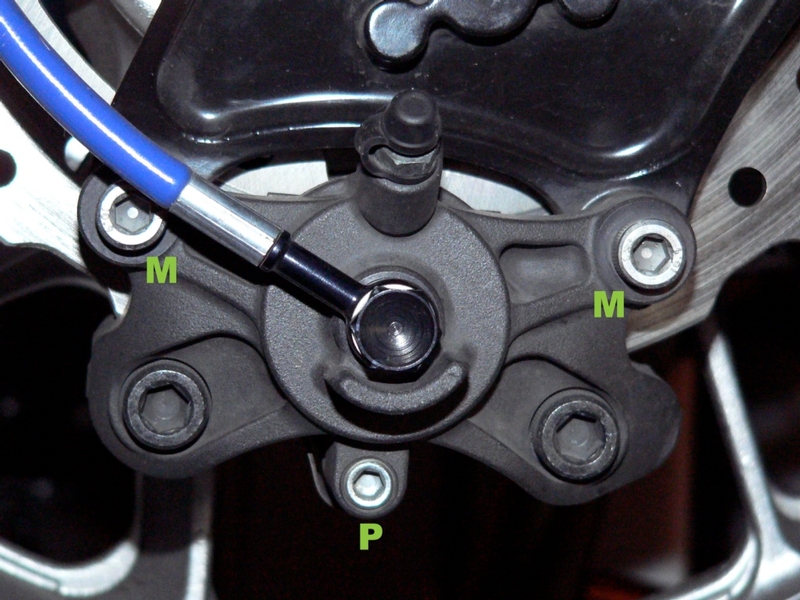
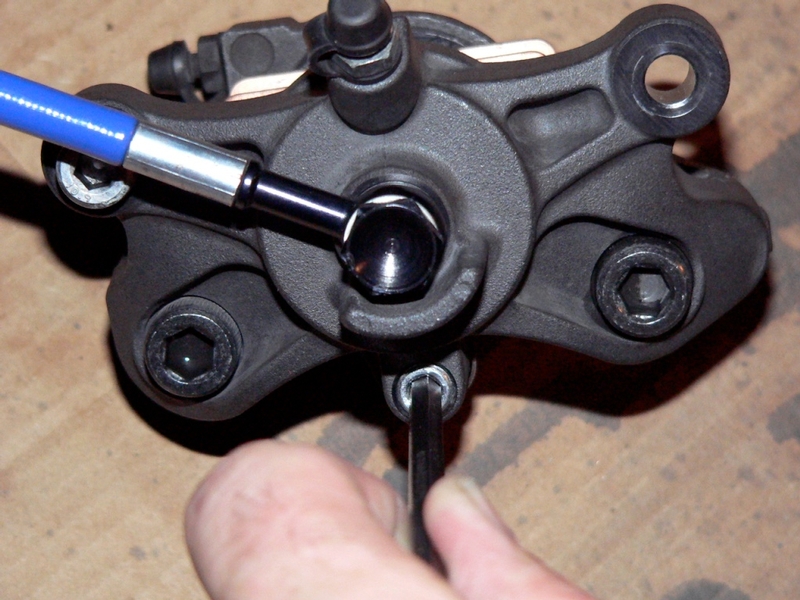
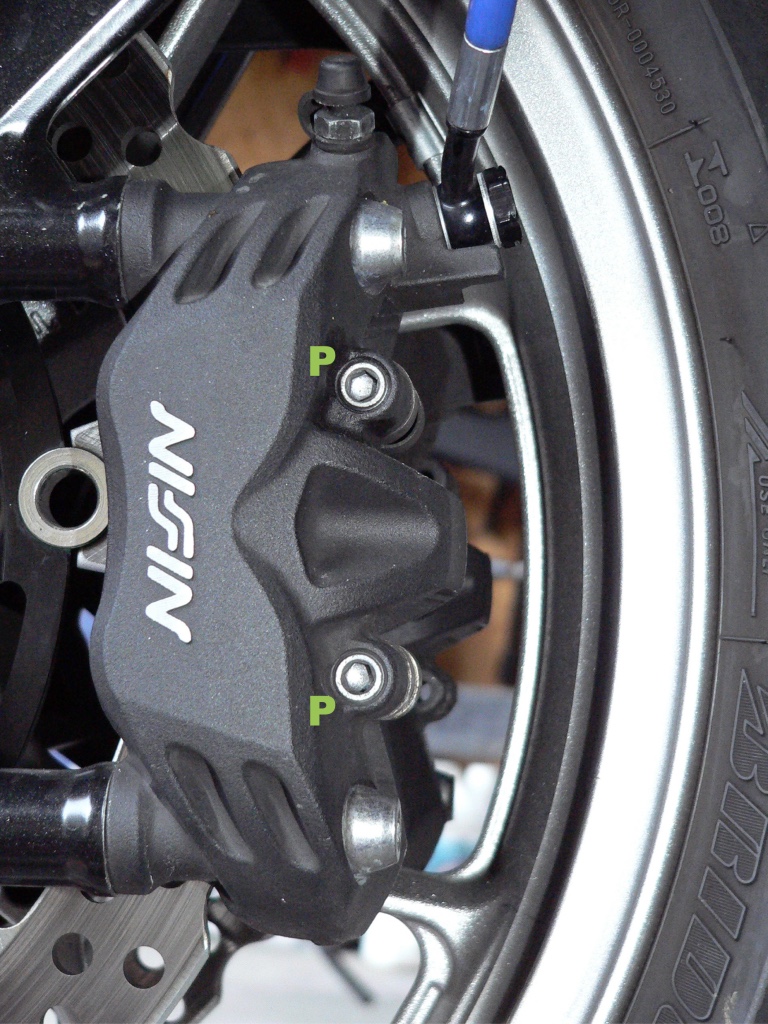
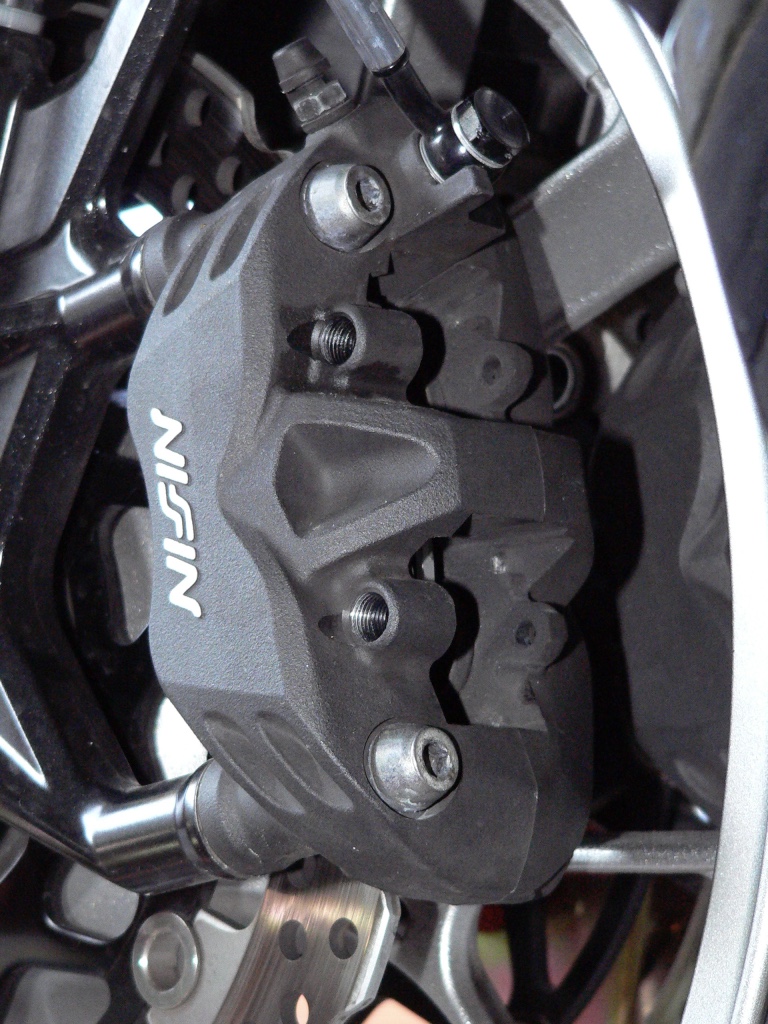
1. Use a 5mm hex tool to loosen the Brake pad pin [P]. Use a 6mm hex tool to loosen the two caliper mounting bolts [M].

Remove and hang the rear brake caliper (see Brake Caliper Removal, step 7.)

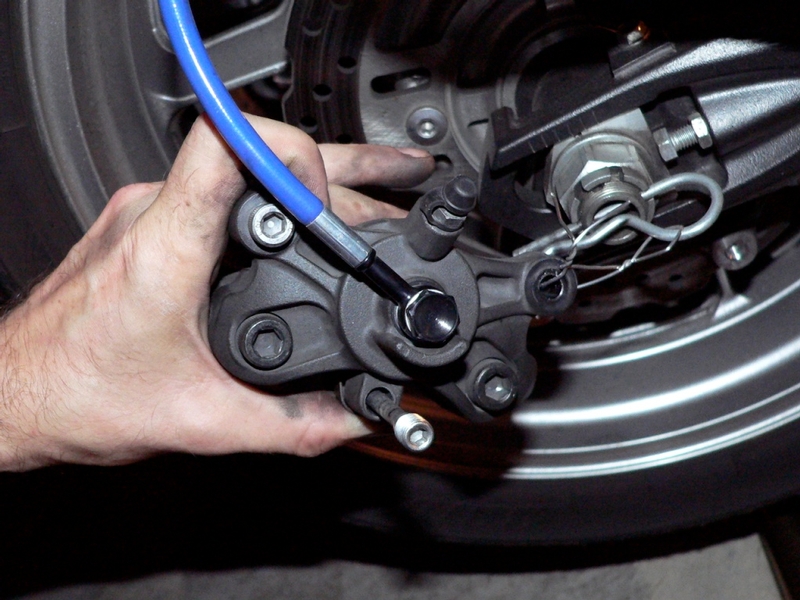
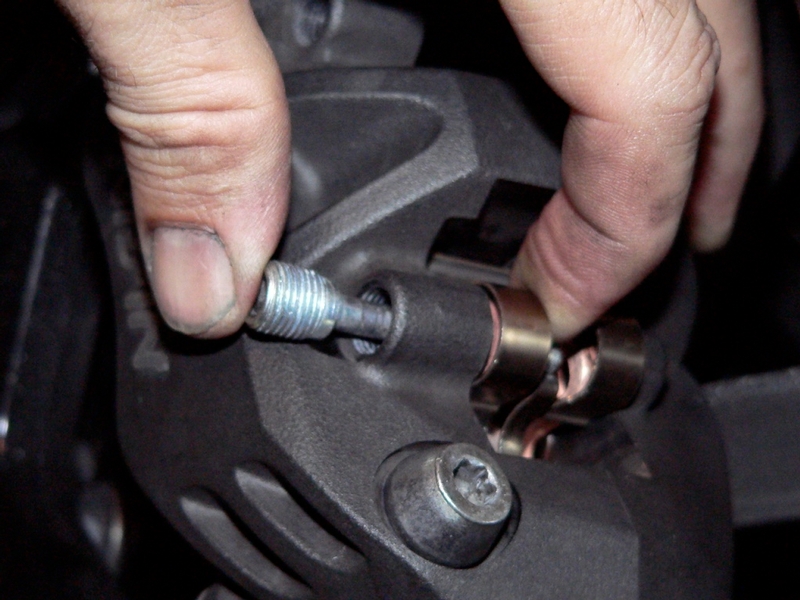
2. With a 5mm hex tool, loosen the rear brake pad pin to the end of its threads.

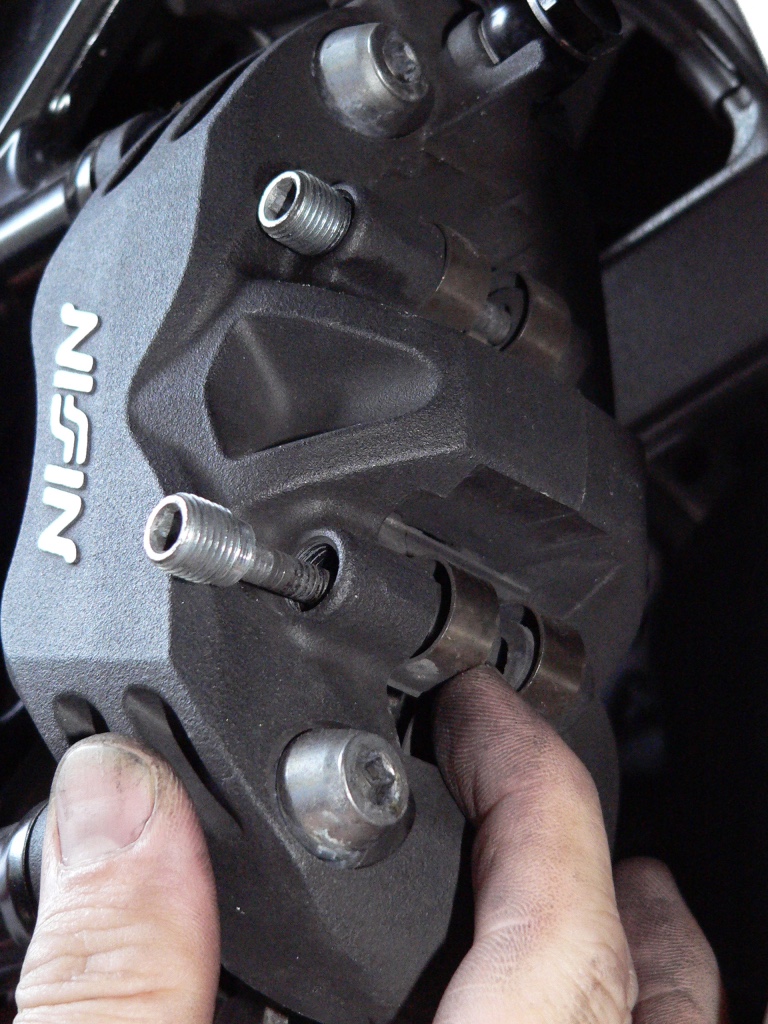
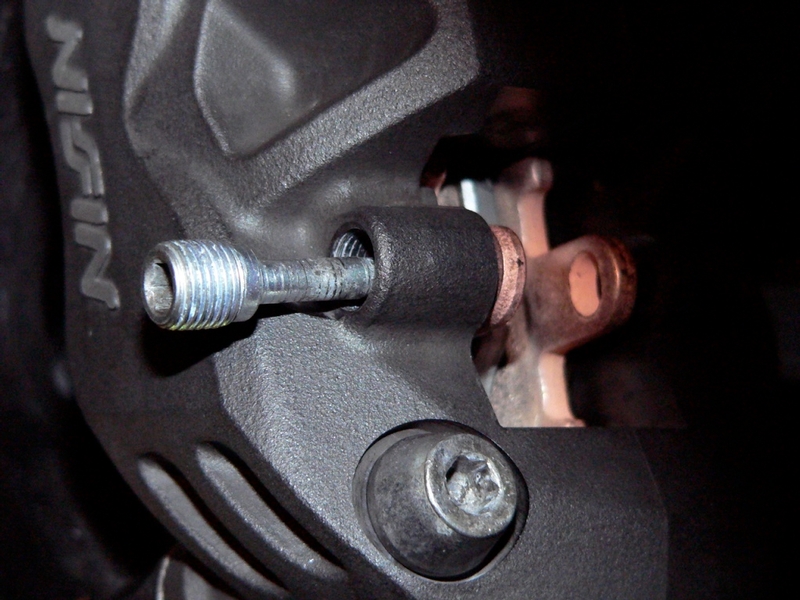
Press the center bar of the spring clip in to relieve tension on the brake pad pin.

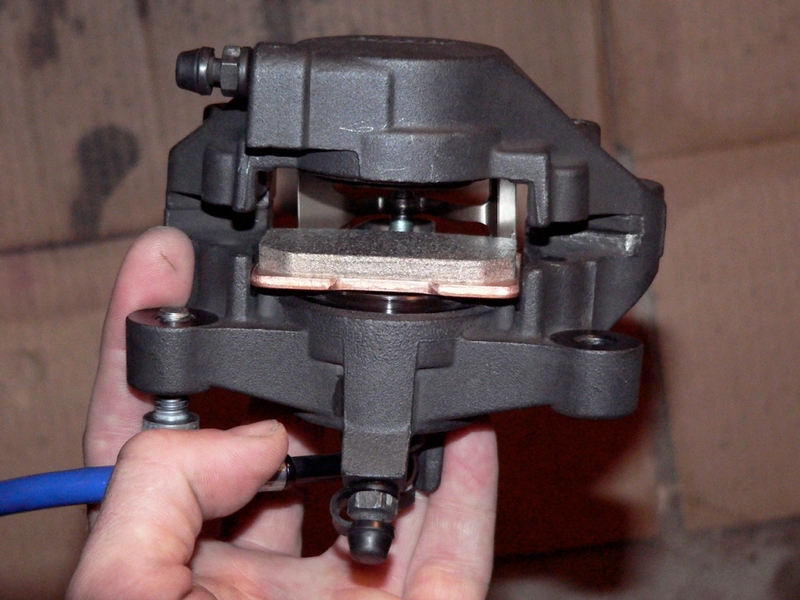
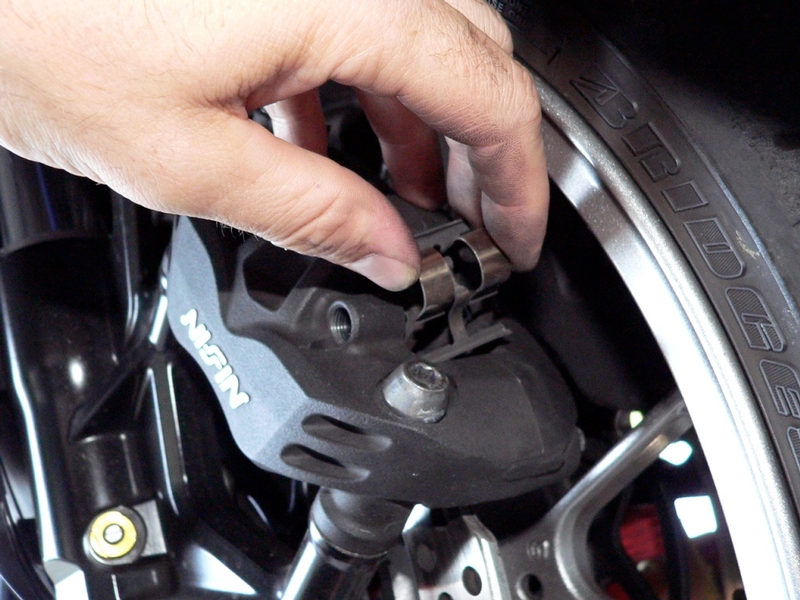
Pull and twist the pin to remove it. After the pin is pulled out half way, the spring will pop out and the outside pad will be free.

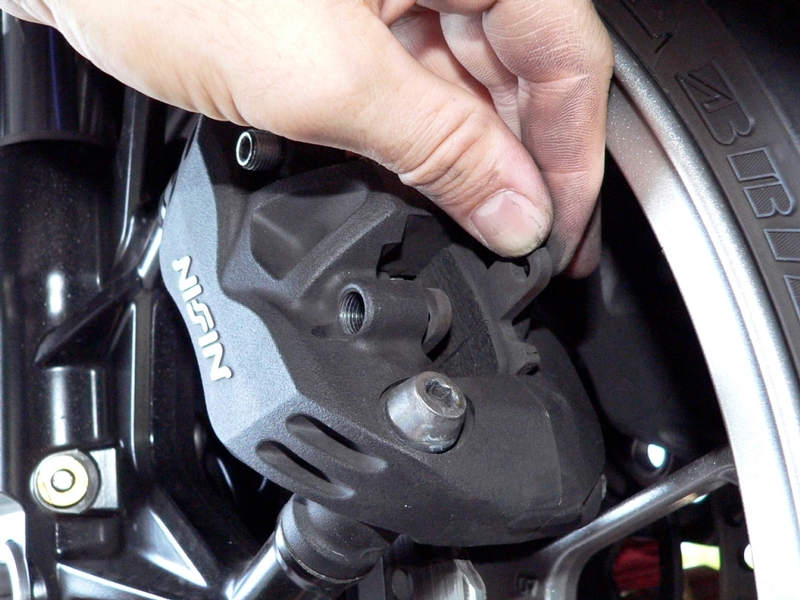
Block the top and bottom edges of caliper with your finger and thumb as shown in pic below so that the spring clip and brake pads do not fall out.

Continue pulling pin until it is removed.


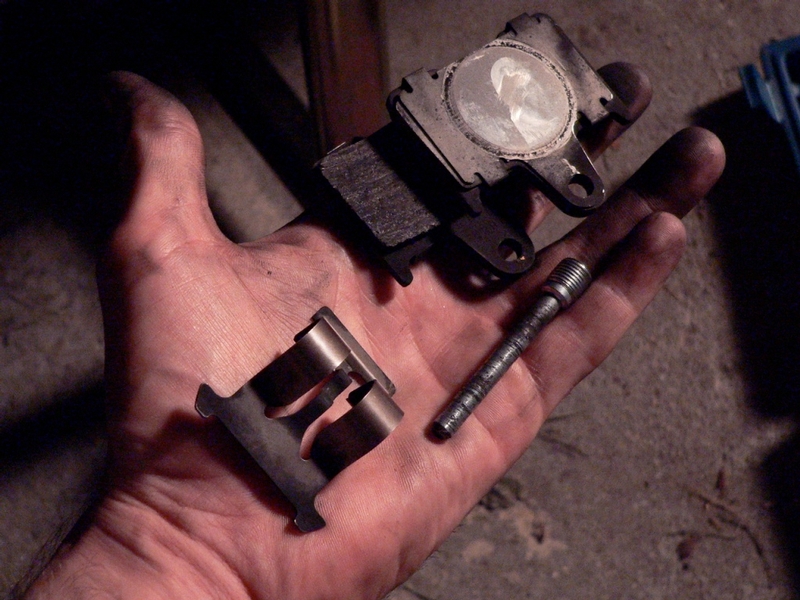
3. Remove pads spring and pin.

I immediately marked the pads with a Sharpie so that it would be possible to reinstall them with the pads on the same side of the rotor from which they came.


Rear
Installation

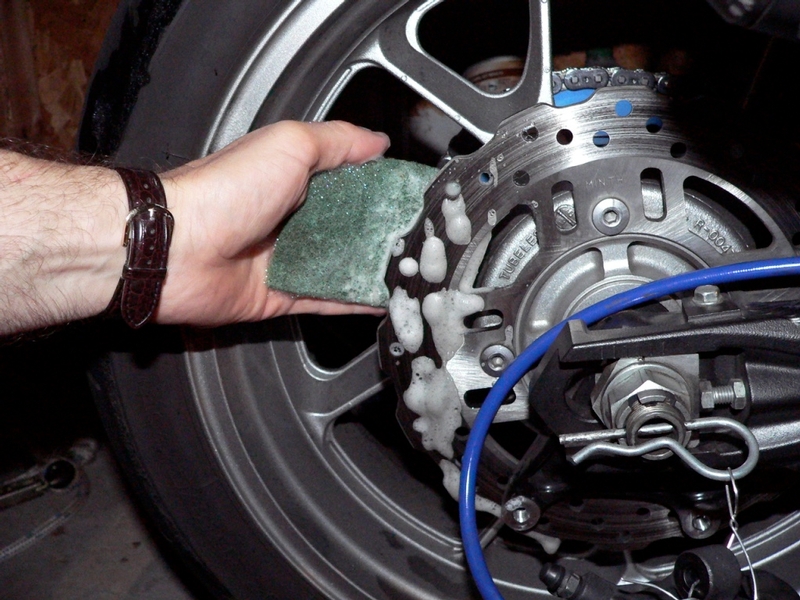
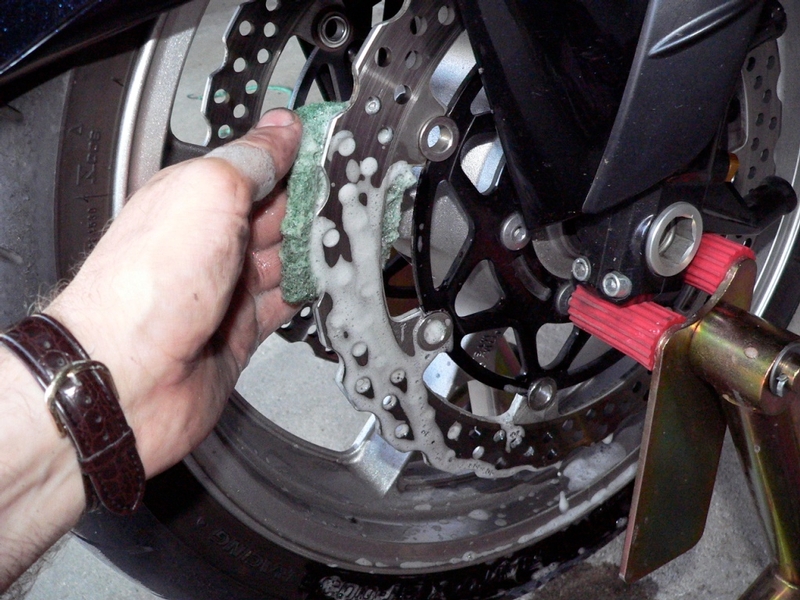
4. Rotors should be resurfaced and cleaned of all traces of embedded material from the previous brake pads. Sand papering the rotors is probably more likely to cause irregular wear to the rotors or introduce impurities from the sand paper.

I simply scrubbed the rotors with a scotch bright pad and the same automotive soap I use to wash the bike. I was careful to clean out each hole in the rotor with the small bristled end of a denture brush brush.

I used the denture brush and soapy water to thoroughly wash the caliper and the pistons (rear caliper has shiny dark grey coating on pistons, front has a deep red). It’s hard to clean the calipers thoroughly and this is an ideal time to get it done well since the caliper is removed from the bike. I also cleaned off the pad pin and spring clip with soap and water.


5. I rinsed the rotor, caliper and other parts well with water. Then carefully applied a
brake cleaner to help the water evaporate quickly. Brake cleaner will damage the finish on plastic and paint so if you use it, be careful. It is not good for removing caked brake dust. It is primarily meant to remove grease and loose dust. I sprayed it into a rag and rubbed it on the rotors by hand.

I also laid the new pads on a sheet of cardboard and soaked them with brake cleaner in case there might be any kind of residue on the new pads.


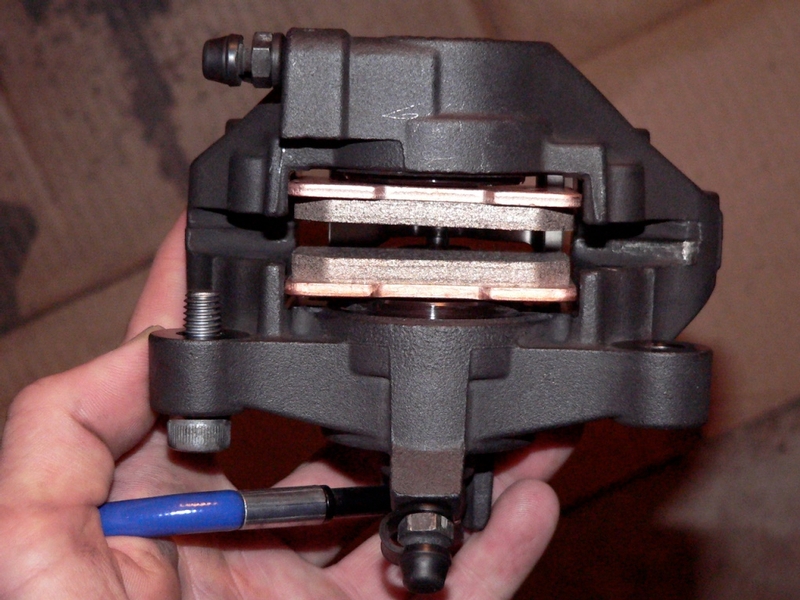
6. The pistons will be extended too far for the thickness of the new pads. Press the pistons into the caliper housing with your fingers so the pistons are about flush with the inside surface of the caliper.

Place the new outboard pad in the caliper.

Insert the pin through the outer facing hole in the caliper and the hole in the pad.

Press center bar of clip to allow the pin to slide over and maintain flexion on the clip.

Position inboard pad into caliper and push the pad pin through it’s hole and into the inner hole in the caliper.


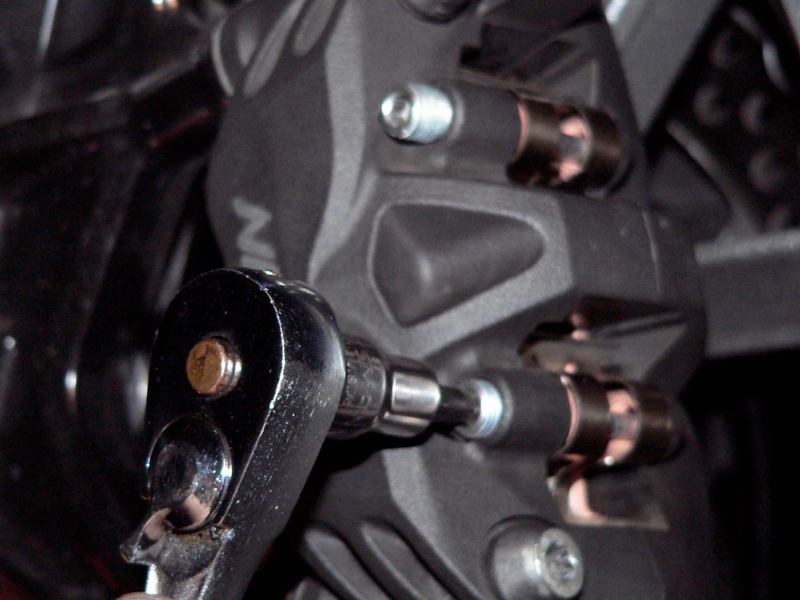
7. Use a 5mm hex tool to thread the pad pin into the caliper.


8. Install the rear brake caliper to the mounting plate (see BRAKE CALIPER REMOVAL, steps 8 through 11).

Torque rear brake pad pin to 13 ft lbs using a 5mm hex tool.


9. The new pads will be thicker than the worn ones. This could the fluid level in the reservoir to rise past the UPPER line. An overfilled brake system may cause brakes to lock when the fluid expands from heat.

Check fluid level of rear brake fluid reservoir and adjust if necessary (see BRAKE FLUID BLEED AND PURGE, steps 1, 2 and 11 through 16).

Front Brake Pads
Removal

10. Loosen the brake pad pins [P]on the front caliper with a 5mm hex tool.


11. Relieve tension on one pin by pressing the center bar of the spring clip.

Remove the pin and mark it top or bottom.

Remove the other pin in the same way.


12. Remove the spring clip taking care not to let the four pads fall out.


13. There are a total of eight pads in both front calipers and it is very easy to confuse them. Label them left, right, top, bottom, inner, outer as you remove them so that they may be reinstalled in the same position if necessary.

Slide the inner top pads out of the caliper toward the rear of the bike.

Label the pads with a Sharpie permanent marker immediately as they are pulled from the caliper.

Remove the inner and outer bottom pads in the same way.


14. Repeat steps 10 through 13 to remove the brake pads from the other front caliper.


Front
Installation

15. Wash the rotors with a scotch bright pad and soapy water. You may carefully apply brake parts cleaner that has been sprayed onto a rag to encourage evaporation and clean any soap residue.


16. If you wish to thoroughly wash the calipers, remove them from the mounts on the fork bottoms (see BRAKE CALIPER REMOVAL, steps 1 and 2)

Wash the caliper, pistons, clips and pins with soap and water and a denture brush.

Carefully apply brake parts cleaner as a final step to cleaning.

Apply brake parts cleaner to all of the new pads as well Be careful to protect painted and plastic surfaces from overspray.

Reinstall the calipers (see BRAKE CALIPER REMOVAL, steps 4 and 5).


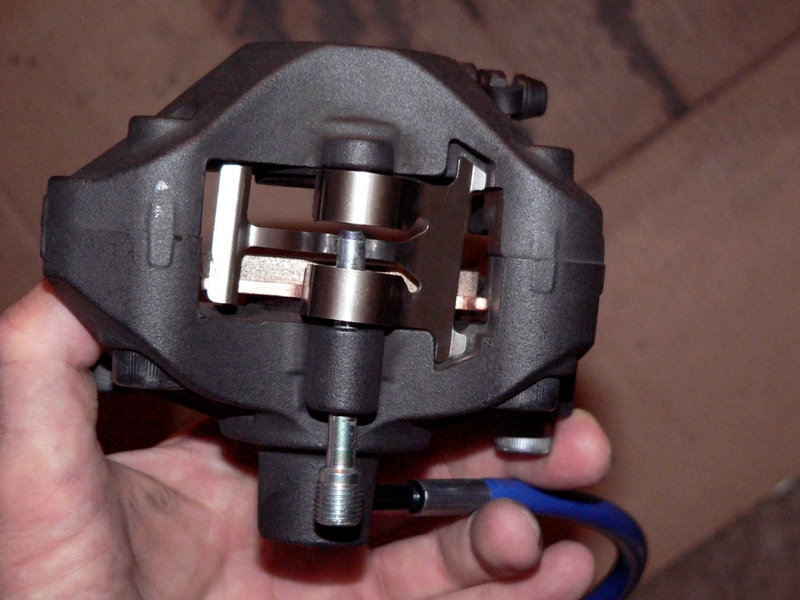
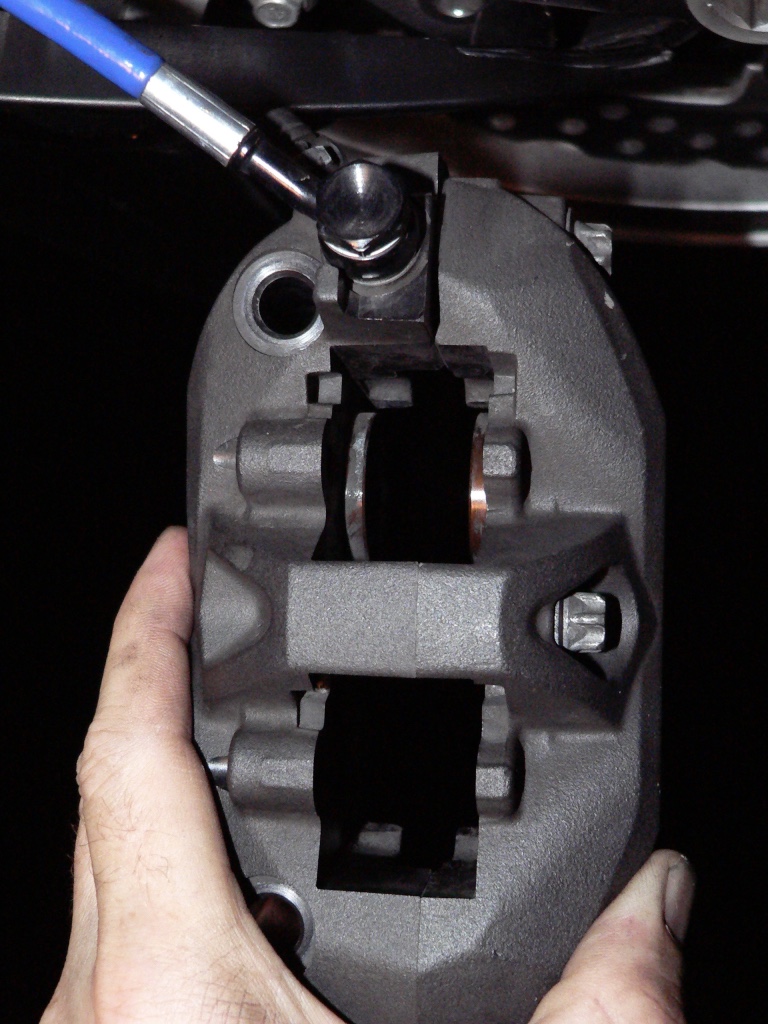
17. Press the pistons into the caliper housing with your fingers so the pistons are about flush with the inside surface of the caliper. The bottom pistons in the pic have been pressed in.


18. Slide two new pads into the bottom chamber of the caliper.

Slide the brake pad pin through the outboard hole in the caliper and the hole in the outboard pad.


19. Set the spring clip in place and press the center bar of the spring clip in so that the
brake pad pin slides over it.

Press the brake pad pin all the way through the hole in the inboard brake pad and the inboard hole in the caliper.

Thread the brake pad pin in hand tight.


20. Torque the brake pad pins to 13 ft lbs using a 5mm hex tool. Repeat steps 20-23 for the right caliper.


21. The new pads will be thicker than the worn ones. This could the fluid level in the reservoir to rise past the UPPER line. An overfilled brake system may cause brakes to lock when the fluid expands from heat.

Check fluid level of rear brake fluid reservoir and adjust if necessary (see BRAKE FLUID BLEED AND PURGE, steps 1, 2 and 11 through 16).


Weight

The brand new EBC pads weigh 23.63 oz


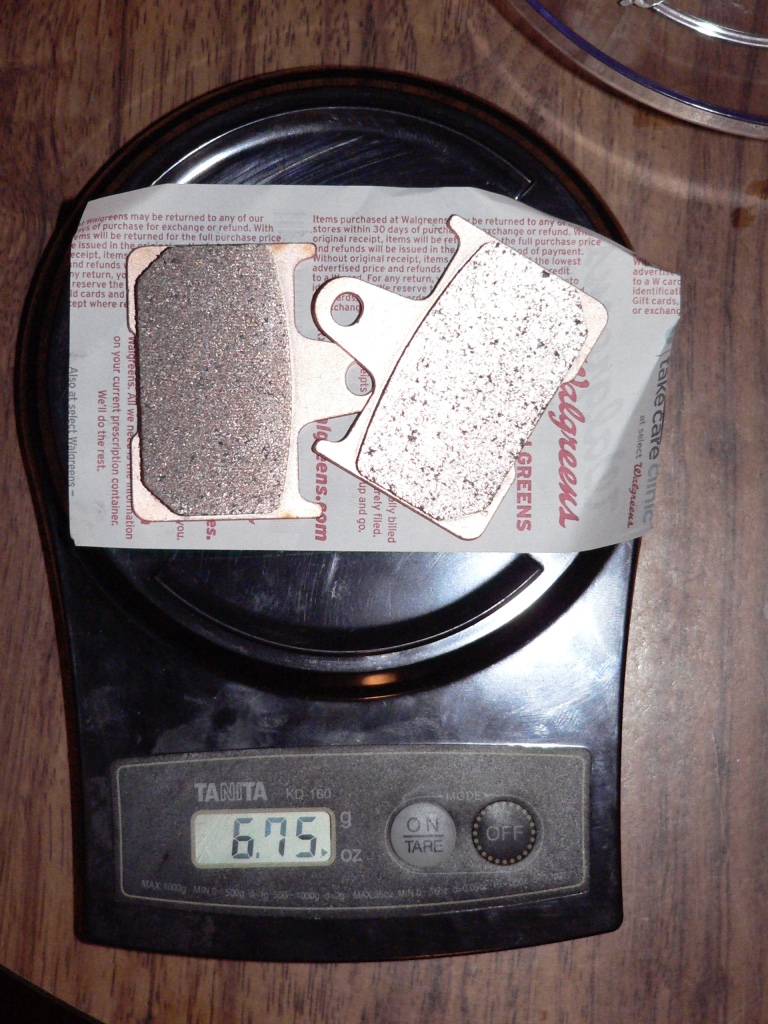
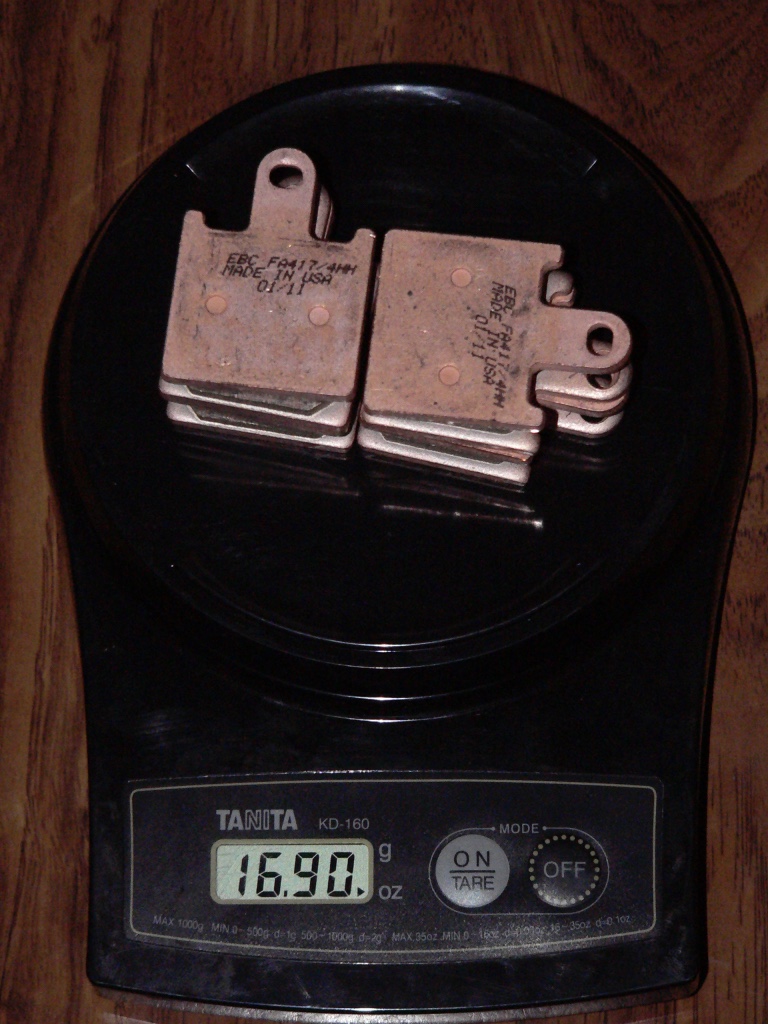
The worn OEM pads weigh 22.23 oz


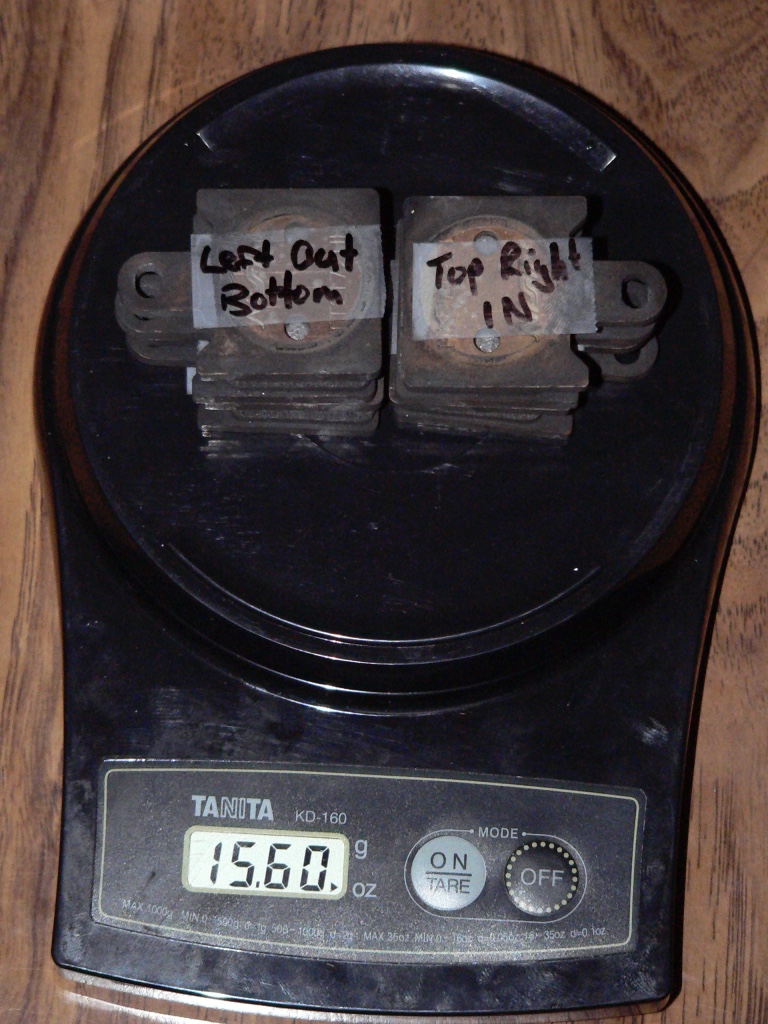
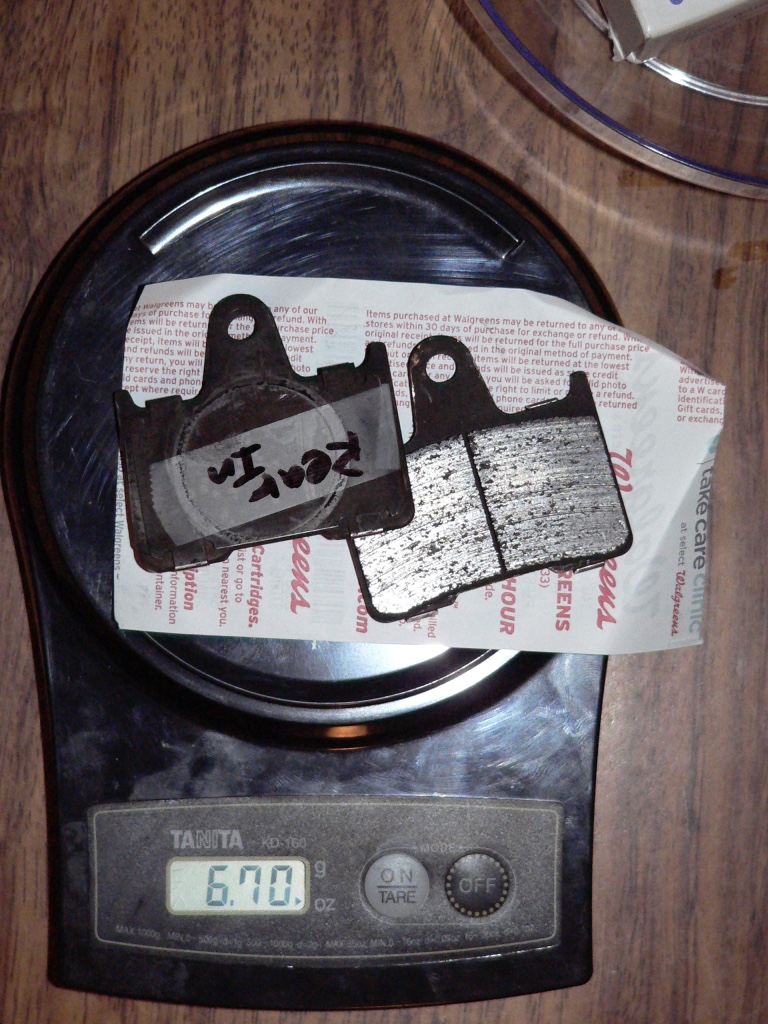
The new EBC pads probably weigh about the same as a new set of OEM pads.


* Last updated by: Rook on 12/9/2017 @ 8:27 PM *


'08 MIDNIGHT SAPPHIRE BLUE Now Deceased

Link | Top | Bottom

COOTER


COOTER's Gravatar

Location:

South West Florida

Joined: 04/27/11

Posts: 1342

RE: Rear and Front Brake pad Install
08/11/11 11:59 PM

Great write up keep up the good work


Team panda (ride safe ride sober)

Link | Top | Bottom

Grn14


Grn14's Gravatar

Location: Montana

Joined: 02/25/09

Posts: 15511

RE: Rear and Front Brake pad Install
08/12/11 12:32 AM

Yes...and always make sure your white dot on the reservoir cap is lined up under your reservoir clamp .

Link | Top | Bottom

Rook


Rook's Gravatar

Joined: 03/28/09

Posts: 20589

RE: Rear and Front Brake pad Install
12/03/11 4:27 AM

^^^Actually, torquing the screw properly might be more important. Lost the clamp and screw. Cap seems lie it came loose just a bit and a couple drops of brake fluid etched my multi function display. Took a lot of buffing but got it back to new looking.


'08 MIDNIGHT SAPPHIRE BLUE Now Deceased

Link | Top | Bottom

doznkoz


doznkoz's Gravatar

Joined: 02/27/16

Posts: 165

RE: Rear and Front Brake pad Install
08/23/16 5:08 PM

Thanks for this Rook, well done. Maybe a different year bike but the concept is the same. Almost 18,000 mi. on my 15 and I heard the front brake start to squeal a bit on my last ride. Took the calipers off and although it looks like I have some meat left on them I am going to change them out anyway. Going with OEM's this changeout. A bit pricey but its been a totally awesome experience.
Have a great one brother.

Link | Top | Bottom

Rook


Rook's Gravatar

Joined: 03/28/09

Posts: 20589

RE: Rear and Front Brake pad Install
08/23/16 6:31 PM

Glad that helped you out, doznkoz. I've had OEM pads with OEM rotors and EBC HHH pads with OEM rotors and HHH pads with CZ rotors. I don't notice any performance difference. They all stop great and feel about the same. Never noticed any squeal with the EBCs. The semi floating Cz rotors do groan under heavy braking though but I think that's normal and I'm used to it now. Galfer rear rotor with HHH pads and that's the same too.


'08 MIDNIGHT SAPPHIRE BLUE Now Deceased

Link | Top | Bottom

doznkoz


doznkoz's Gravatar

Joined: 02/27/16

Posts: 165

RE: Rear and Front Brake pad Install
08/24/16 4:12 PM

Hey there Rook. Picked up the brake pads from my Kaw dealer and much to my surprise they were EBC's. They recommended them and stated they were not as expensive as OEM's but I beg to differ. Charged me $132.00 for the two sets. OEM's were $62.50 a pair according to their parts list.
Hopefully these photos will show up here. Not a whole lot of difference between the wear on the original pads and the new ones that I can tell. Think I ought to change them out anyway? 18,000 miles (I am not hard on the front brake to begin with. I downshift most of the time to slow down).
Thanks.


Link | Top | Bottom

doznkoz


doznkoz's Gravatar

Joined: 02/27/16

Posts: 165

RE: Rear and Front Brake pad Install
08/24/16 5:18 PM

Forget I asked. Got them out and compared. Over half of the pads are wore. Change out but first a good cleaning. Thanks for the tips.

- about an hour later, finished. If it was any easier it would do it by itself. Found these EBC's for $20 less a set at a few different vendors. Not going to rob me twice. Thanks again.


* Last updated by: doznkoz on 8/24/2016 @ 6:25 PM *

Link | Top | Bottom

Rook


Rook's Gravatar

Joined: 03/28/09

Posts: 20589

RE: Rear and Front Brake pad Install
08/25/16 12:25 AM

Hopefully these photos will show up here.

nope photobucket is the way to go or the forum pic function if you must.

Not a whole lot of difference between the wear on the original pads and the new ones that I can tell. Think I ought to change them out anyway?

Can't see them but if the wear bars look similar to a brand new set, I'd say keep the olds. They are bedded in to the rotors. No good reason to change if they have life in them. Can always do that later. The old ones might be glazed if your gentle on the brakes. That could cause the low speed squeal or exacerbate it. Hub sometimes suggests a gentle even scuff across the sidewalk for glazed pads (but don't tell no one he told me so and I told you). Just don't change the wear profile of the pads or there went your bed in. I'd keep the olds.

Over half of the pads are wore. Change out but first a good cleaning.

Is the glass half full or half empty?

I have used old pads on new rotors, you can use new pads on old rotors. These brakes are so good, the pads will grab plenty hard even if not bedded in. I always say, if they lock the wheel, that is as good as it gets and these will definitely do so as long as you didn't get those horrible organic compound pads. If you're light on brakes, I doubt you will notice a difference except these will be quiet a long time.


'08 MIDNIGHT SAPPHIRE BLUE Now Deceased

Link | Top | Bottom

doznkoz


doznkoz's Gravatar

Joined: 02/27/16

Posts: 165

RE: Rear and Front Brake pad Install
08/26/16 4:58 AM

Changed them out and quiet as a mouse. Now I need to find out how to tighten up the stem because I am now hearing that click when applying the front brakes. I heard this before I replaced the pads so that is not the cause. I read about this last week in here. Using the spanner type wrench I saw at Kaw can this be done without removing anything from the handle bars? I may just take it in to the shop in the morning since they have a first come first serve situation (it's a Yamaha dealer I have used before).

Link | Top | Bottom

Hub


Hub's Gravatar

Joined: 02/05/09

Posts: 13718

RE: Rear and Front Brake pad Install
08/26/16 8:53 AM

The neck click is a first service inspection. If you watch the one approach, this more torques the top crown at V kind of pressure. In other words, you need to relieve the outer pinch bolts so the whole crown statically floats flat in torque, then tighten the pinch bolts back to spec.

Then, before you tighten the pinch bolts, you check for the click noise or the steering neck is too tight on the balls upon torque-down of the top crown.

If it's front steering repacking time with grease, that means the full front end off the bike. This process is to float the one fork, torque the other leg out of the top crown to spec. Once the axle statically floats, then that pinches the lower stem forks. This lets the top crown float and can torque the triple's nut to spec, feel for click, etc.
http://s149.photobucket.com/user/wazfst1tyme/media/Fork%20Float%20Axle%20Setup_zpsiaqvyy9c.mp4.html?filters[user]=42802070&filters[recent]=1&filters[publicOnly]=1&sort=1&o=0

I removed the anti squeaker springs so the pads float. I'm almost ready for a set of pads and fresh dot, and front end lube. Anyone want a brake pad change/brake bleed/steering bearing vid? It comes with the 'meat puppets' remember.


Tormenting the motorcycling community one post at a time

Link | Top | Bottom

doznkoz


doznkoz's Gravatar

Joined: 02/27/16

Posts: 165

RE: Rear and Front Brake pad Install
08/26/16 4:09 PM

Hello Hub. Kaw must have tightened the stem up after the first service on the bike at 400 miles because back then I noticed that the paint was chipped around the top stem bolt, evidence of a socket being on it. Anyway after work I took the bike to the Yamaha dealer I mentioned earlier and about 30 minutes later I was back on the highway with no more clicking when applying the front brake. Great guys there, they did not even charge me a dime. One of the techs there rides a 1999 Kaw 1100 and was thrilled to take mine for a spin. Said he had never rode a modern 14r and upon his return stated that "it appeared that Kaw had by this time gotten the bugs out of the bike'. Said it was a "rocket" to ride. This, I already knew.

The manual states that at either 24,000 miles or 2 years for lubricating the steering stem bearings. I saw a video of it being done last night on another bike. I guess I could get my garage set up to start doing the maintenance to this bike myself. I for one would like the video you are referring to, about the brake change/fluid change/steering bearing vid. I have yet to change the brake fluid. Last week using a large syringe I pulled out nearly all of the old brake fluid from the front reservoir and replaced with new. Not a complete change and I know this which is why the video would help. Got to keep that air out, right? Need to do the back too. My manufacturer warranty is over this coming December. I just might have this bike tore apart in my garage for maintenance this winter. Glad you experienced guys are here to help this rookie.

Thanks for the info and help Hub.

Link | Top | Bottom

Rook


Rook's Gravatar

Joined: 03/28/09

Posts: 20589

RE: Rear and Front Brake pad Install
08/26/16 7:57 PM

here's how I do it.

If you sucked the fluid out of the reservoir, that is probably sufficient. That must be at least 2/3 of all the fluid in the whole system. If you completely drain the system, you will need to bleed air but I have not had a problem doing this. The master cylinder can take a bit of work to get the fluid sucked down into it if it is dry but the rest is no big deal.


'08 MIDNIGHT SAPPHIRE BLUE Now Deceased

Link | Top | Bottom

doznkoz


doznkoz's Gravatar

Joined: 02/27/16

Posts: 165

RE: Rear and Front Brake pad Install
08/26/16 9:03 PM

Awesome Rook! You are something else. The time you took to do this isn't going to be unappreciated. Got to get that clutch oil changed out also. I am going to take a better look at your tutorial tomorrow. Kudos!

Link | Top | Bottom

Rook


Rook's Gravatar

Joined: 03/28/09

Posts: 20589

RE: Rear and Front Brake pad Install
08/27/16 12:49 AM

There's a shiteload of them sort of in alphabetical order right now though I plan to rearrange according to bike system like the service manual is.


'08 MIDNIGHT SAPPHIRE BLUE Now Deceased

Link | Top | Bottom

doznkoz


doznkoz's Gravatar

Joined: 02/27/16

Posts: 165

RE: Rear and Front Brake pad Install
08/27/16 8:16 PM

Now that's what I'm talking about! You are an excellent illustrator Rook.
Pretty much everything I need you have covered. Thank you so much brother.

Link | Top | Bottom

Rook


Rook's Gravatar

Joined: 03/28/09

Posts: 20589

RE: Rear and Front Brake pad Install
08/27/16 9:37 PM

There's more on the way but these things take time...and I actually have to do them. LOL I was a pro illustrator at one time in my life. Art for advertising, packaging, etc. Motorcycles came second.


'08 MIDNIGHT SAPPHIRE BLUE Now Deceased

Link | Top | Bottom

Hub


Hub's Gravatar

Joined: 02/05/09

Posts: 13718

RE: Rear and Front Brake pad Install
08/27/16 9:49 PM

Well Dozn, I aborted my vid. A piston fell out, it became a mess the more I worked on it. The oil catch tank did not have a relieve valve, ie, I have to remember next time to crack the lid open. All that pressure pushing fresh oil in the line down to that tank, it backwashed the second I took the off the nipple. Like drilling for oil, it shot up and ran all over the new pads, caliper, fender, rim, tire, you name it. Maybe I'll see what it looks like and edit just the torsion part of the brake pad pins. Or if it's a complete wash, I marked the torque [26ftlb] on the caliper bolt, but hand tighten the pins.

The trick with the hex is to create a torsion effect or 'keep spring loading the hex wrench,' socket, etc. If you just slam down on the hex head, you'll round out the hex more or less. That's why when I see a torx or hex head, I'm doing a lot of fulcrum-forcing-flexing in the torsion dept. Then you hear this snap and you're home free.

I also let my pads float by eliminating the spring retainers.
I cleaned the master's nipple and thought I had the air out. So I'm trying a zip-tie trick is to zip the lever almost to the grip, leave it overnight. If I get a lever back, I'll see if it works. If not, back to the master's nipple and for sure a hard lever.

As far as ABS, I should have pumped ABS box and those nipples off the unit. Never studied the flow, but I ran a lot of fluid thinking it would purge thru the box and back to the caliper? Next time I'll hook up the catch tank to the ABS box and check the action.


Tormenting the motorcycling community one post at a time

Link | Top | Bottom

Rook


Rook's Gravatar

Joined: 03/28/09

Posts: 20589

RE: Rear and Front Brake pad Install
08/28/16 7:20 AM

Oh yeah, if your bike has ABS, that might entail a bit more work to avoid air. I've drained the whole system on my non ABS brakes to change lines and it's not too much work to bleed. The front MC took some pumping once. I'd just drain to the bottom of the reservoir the first few times you freshen up the fluid. After you get the knack of how it works, you can drain everything and find out what it's like to bleed eveything of air. One thing I would do is try to wipe out that black sediment that will form in the bottom of the reservoir. Do this when you get very close to the bottom and use aa clean cloth that will not release fibers like a good paper towel. I don't think it's the end of the world to suck that black sediment down into the MC. I've done it a couple times and no problem but I guess I would rather avoid it. Might be a good reason to replace that baffle in the reservoir which I have never done yet.


'08 MIDNIGHT SAPPHIRE BLUE Now Deceased

Link | Top | Bottom

Hub


Hub's Gravatar

Joined: 02/05/09

Posts: 13718

RE: Rear and Front Brake pad Install
08/28/16 8:28 AM

If the pads slide right out, pads look even in wear, the pistons are not hung up. I had one pad set drag so I had to yank the rest. I still had the cut line present on the other 6 pads, so there was more to go. I think the other set would have hit metal to metal within days. I haven't used the rear brake on any of my 14's.

And no, I do not break-in pads as if I need to bed them in hard. They are more a normal ride from stop to stop. The aborted vid was more me cleaning up the dot as the camera rolled. This is what I meant as to attaching a hex like the pins. "This is for all you meat puppet fans out there."


Tormenting the motorcycling community one post at a time

Link | Top | Bottom

doznkoz


doznkoz's Gravatar

Joined: 02/27/16

Posts: 165

RE: Rear and Front Brake pad Install
08/28/16 10:33 AM

I will say this Rook, the fluid in the front brake reservoir was darker in color then the clutch oil when I changed it out. Same oil so I knew it was dirty. Yes, I do have ABS and for a while I think I will just change the reservoir oil for now. I failed to check for sediment in the bottom of it but now that you mentioned it I will do it again and look. The baffle has only been in oil for "maybe 18 months" so I think I will probably keep it for now. Bought the bike new in May of 15 and much to my surprise Big K extended my warranty 6 months after the melted fans incident (I know I mentioned this earlier). Keep those tutorials coming Professor! Need to get a platform lift so I am not always scooting around on a craftsman stool. Would be so much better.

Hub, you had me cracking up while viewing that video. You have a good sense of humor brother. I noticed how you twisted the "whatever that was" to show that SMILE! Haha! Question: Did I understand you correctly when you said that you eliminate the retainer springs so the pads "float"? What is the reasoning for that? Curious. Just trying to learn buddy. Thanks for the video sir. It was amusing and enjoyed the tune. Never heard it before.

Link | Top | Bottom

Hub


Hub's Gravatar

Joined: 02/05/09

Posts: 13718

RE: Rear and Front Brake pad Install
08/28/16 3:34 PM

Photo 15. Look at the upside down T of the spring not the U part.
Photo 16. Look at the T part pushing down on the brake pad and you see a rub mark on the top edge of the pad where... the T lands on that area. So as the pad wears, the [pads] drag on the disc, plus it stops the squeak or the harmonics under light braking. If I remove the springs, the pads move away from the disc, less friction, etc.

https://soundcloud.com/pogomix

There are two mixes to this one. I went on youtube for the original. I thought I'd let that wrench hang there for a little comedy effect while I looked for Cody somewhere? Then I can play the vid, listen to the song repeat and post sitting here. His stuff kind of grows on you.

So the zip-tie trick worked. Same familiar lever feel. Hit the start button and rolled away slow (warmup) as normal to the first stop sign. Scary if I had to panic stop just then. Rolled to the next stop and could feel the pads starting to take. Filled the tank and came back with 2 bars remaining. Mostly freeway miles and she's doesn't peep a squeak at all.


Tormenting the motorcycling community one post at a time

Link | Top | Bottom

Rook


Rook's Gravatar

Joined: 03/28/09

Posts: 20589

RE: Rear and Front Brake pad Install
08/28/16 5:30 PM

I will say this Rook, the fluid in the front brake reservoir was darker in color then the clutch oil when I changed it out.

That's always the case. The clutch fluid gets reddish brown. The brake gets dark grey.


'08 MIDNIGHT SAPPHIRE BLUE Now Deceased

Link | Top | Bottom

doznkoz


doznkoz's Gravatar

Joined: 02/27/16

Posts: 165

RE: Rear and Front Brake pad Install
08/30/16 4:47 AM

Understood Hub. Makes sense about the retainer springs. Good to hear that you got that mess cleaned up and all is well again. Zip ties are handy as ever. That was one heck of a test run if you only had two bars left. Love those highways.

Link | Top | Bottom

Rook


Rook's Gravatar

Joined: 03/28/09

Posts: 20589

RE: Rear and Front Brake pad Install
04/30/17 11:22 AM

updated


'08 MIDNIGHT SAPPHIRE BLUE Now Deceased

Link | Top | Bottom


Welcome to zx14ninjaform.com!
 
New Topic Reply
Next Page

Page: 1 2

Previous Page

New Post

Please login to post a response.